Enterprise Endpoint Management with SCCM/MECM: A Complete Homelab Build
Build a full Configuration Manager lab on two VMs, from setup to a laptop reinstalled over the network.
Before you start
- A Windows Server 2025 domain controller whose schema you can extend.
- A hypervisor with room for one more server virtual machine (4 vCPU, 16 GB RAM, about 360 GB of disk) and at least one test client. I used Proxmox VE, but any hypervisor works.
- Domain Admin rights for the setup work.
- A Windows 11 ISO. Evaluation media is fine, because the site runs for a year.
Your values
Fill these in and every command below updates to match. Nothing is sent anywhere.
Run this at your own risk. These steps worked on my hardware; yours may differ. Take a backup first, read each command before running it, and see the disclaimer.
Configuration Manager has a reputation for being hard, and it is, but not for the reason people expect. The wizards are simple and the documentation is good. What makes it hard is that almost nothing tells you clearly when something is wrong: a deployment stays at zero percent with no error, a column shows 0 when the real answer is 1, a client reports success but has installed nothing.
One idea turned this build from guessing into something I could understand: your own access never proves the access of the process that does the work. Four different failures in this project came down to that, and each looked different. They are the most useful part of this guide.
This is the whole build: preparing the domain, the site server, clients, applications, patching, and finally a laptop rebuilt over the network without anyone touching it. The commands are the ones that really ran.
What you end up with
A primary site that manages real machines and does the four things endpoint management is for:
- Install software on machines you choose, and remove it again
- Patch them from your own server instead of directly from Microsoft
- See what they have, what they need, and what failed
- Rebuild one completely over the network, from an empty disk to a managed domain client, with no USB stick and no keyboard
An empty laptop connected to the network becomes a finished machine in about half an hour while you watch.
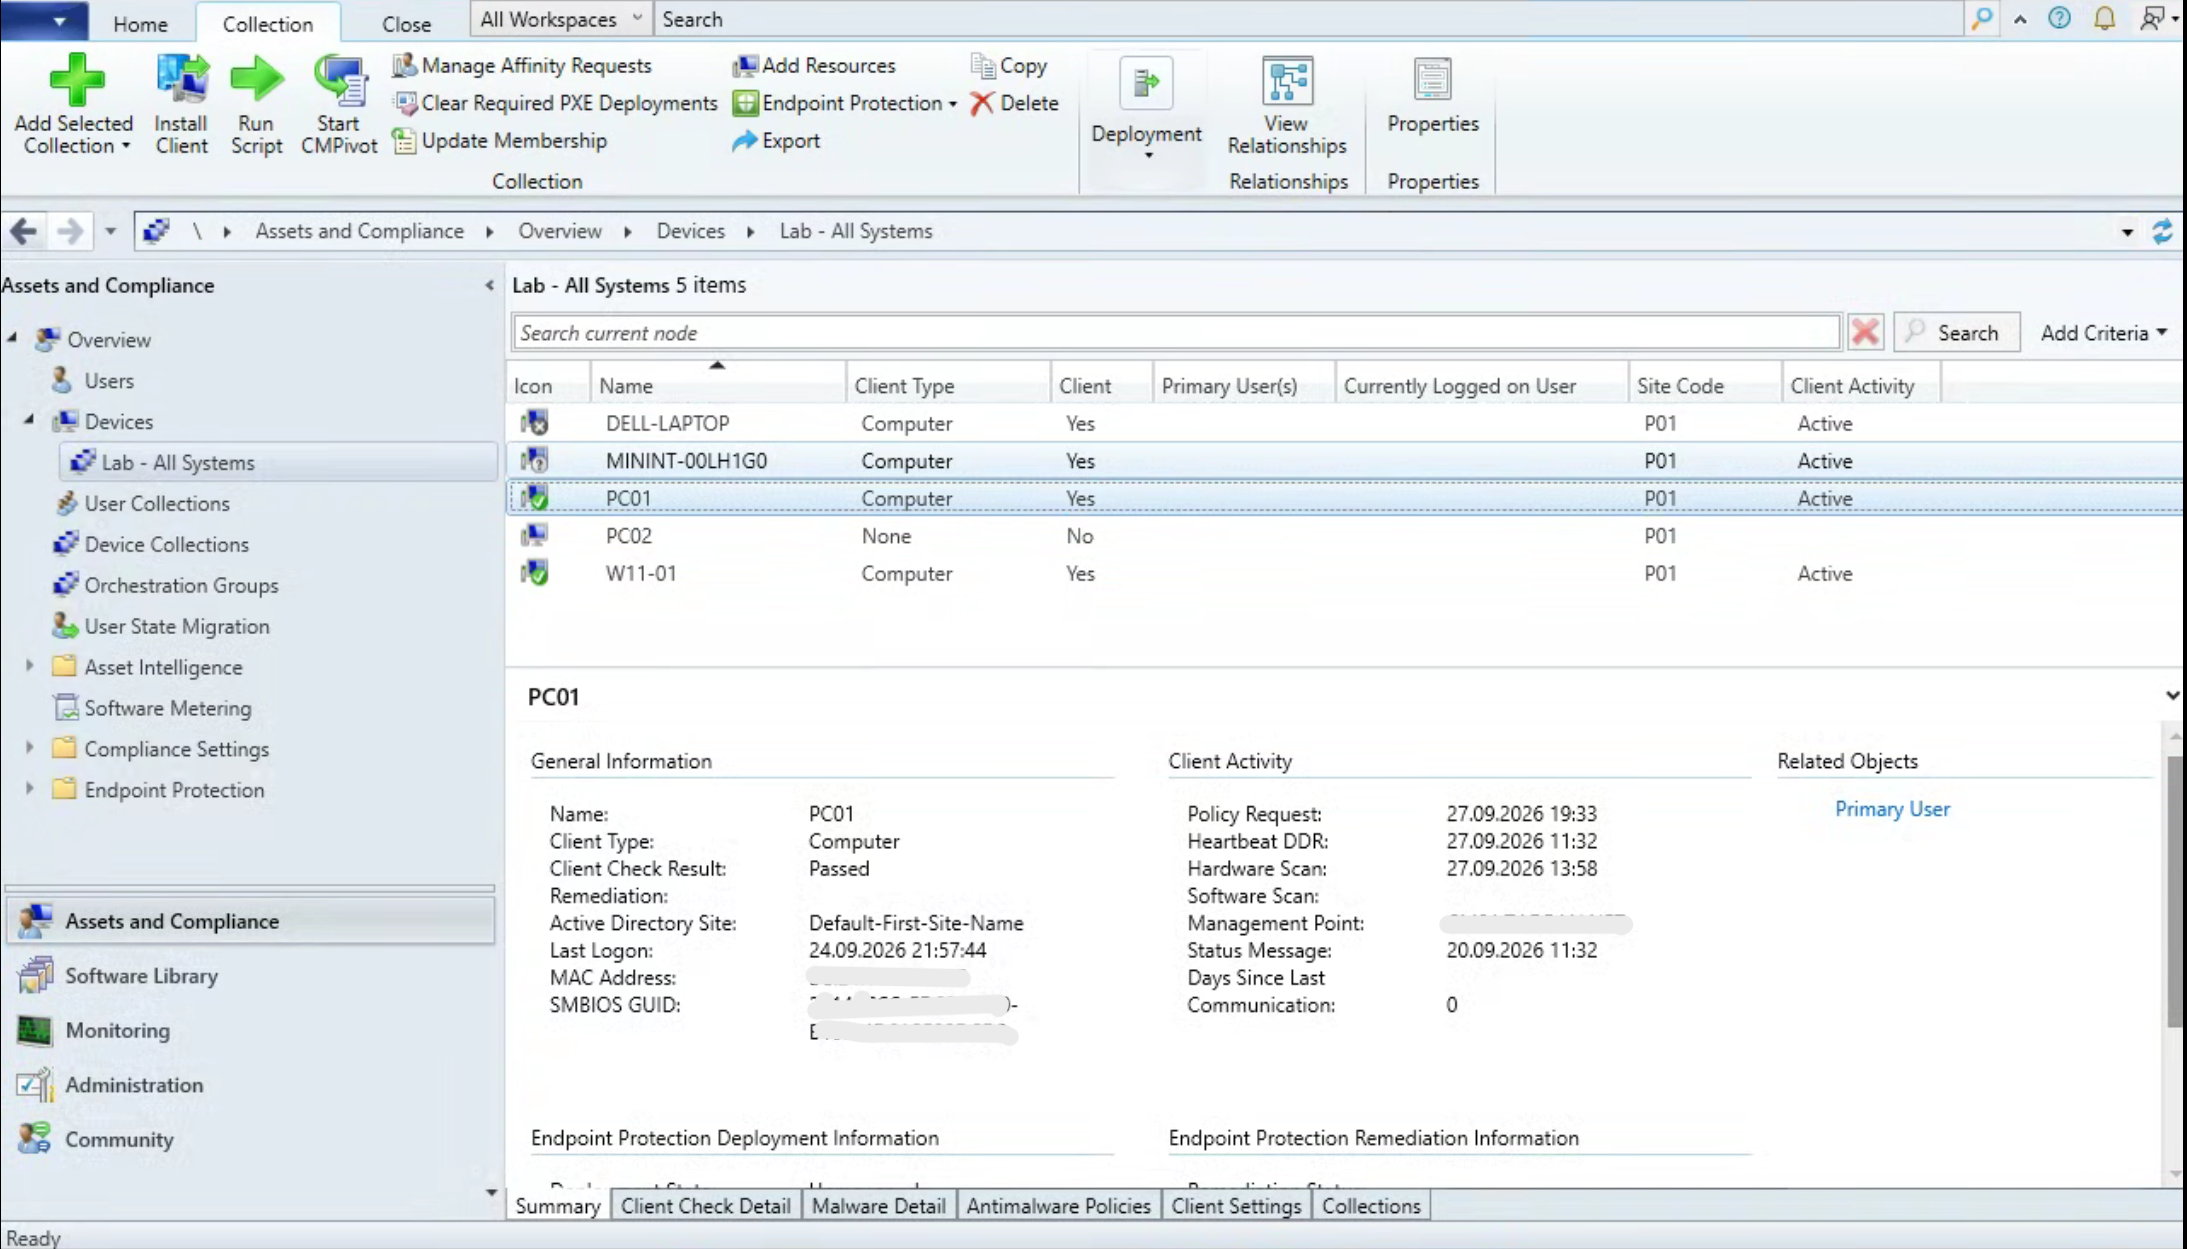
How to find things in the console
Every click path in this guide starts the same way. Open the Configuration Manager console, then:
- Click a workspace at the bottom left: Assets and Compliance, Software Library, Monitoring or Administration.
- In the tree on the left, open Overview and the folder named in the path.
- Use the ribbon at the top, or right-click an item in the list.
So Administration → Overview → Hierarchy Configuration → Boundaries → ribbon Create Boundary means exactly those clicks, in that order.
The design decisions
These choices keep the lab small without making it unrealistic.
| Decision | Choice | Why |
|---|---|---|
| How many servers | One for the site, SQL, management point and distribution point | Many servers teach you about replication, not about management |
| SQL edition | Developer | Free, has all features, and does not expire. Evaluation stops after 180 days. Express is not supported for a primary site |
| Certificates | Enhanced HTTP, no PKI | Configuration Manager creates its own certificates. Building a certificate authority is a project on its own |
| PXE | The built-in responder, not Windows Deployment Services | Fewer parts, and it is what Microsoft develops now |
| Boundaries | IP address range, not IP subnet | A subnet boundary depends on the site calculating the subnet ID, which often causes "this client is in no boundary". A range is clear |
| Discovery scope | A separate OU, not the whole domain | The most important item on this list. See below |
Limit discovery to a lab OU
If your domain has real machines in it, get this right before anything else.
Configuration Manager finds computers in Active Directory, and anything it finds can be targeted. Point discovery at the whole domain, and every machine your family or colleagues use is one careless right-click away from a client push, a required deployment, or a task sequence that erases the disk.
Create OUs for lab machines and limit discovery to them. On a domain controller: Server Manager → Tools → Active Directory Users and Computers → right-click your domain (or an existing OU) → New → Organizational Unit:
OU=Lab-Clients,OU=Stuttgart,DC=YourDomain,DC=com
OU=Servers,OU=Stuttgart,DC=YourDomain,DC=com
Keep automatic site-wide client push off for as long as the lab exists (the setting is shown under The fix below). Push to single machines by hand. It costs one right-click and prevents a whole group of accidents.
Prepare Active Directory
Configuration Manager publishes information about itself in Active Directory, so clients can find it without being told. That needs two things.
1. Extend the schema. A one-time change for the whole forest that cannot be undone. Log on as a member of Schema Admins, open an elevated command prompt, and run from the installation media:
\SMSSETUP\BIN\X64\extadsch.exeIt adds eighteen ms-SMS-* classes and attributes. Open C:\ExtADSch.log and look for Successfully extended the Active Directory schema.
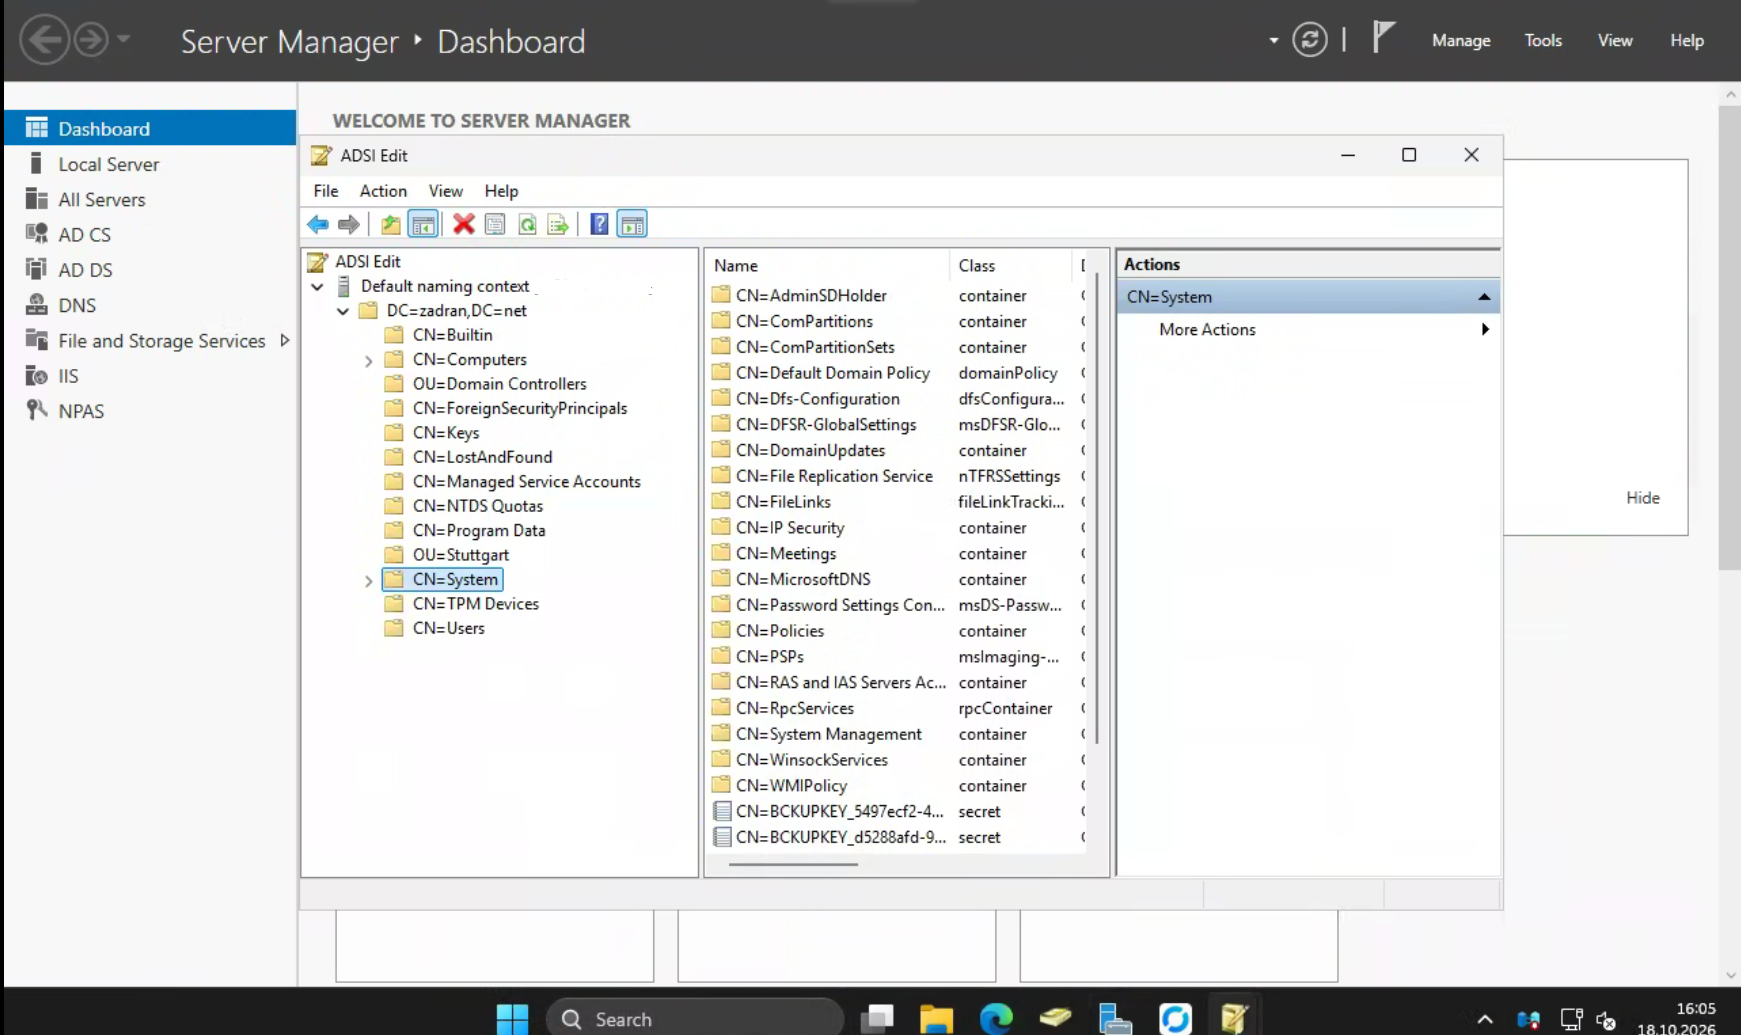
2. Create the System Management container. On a domain controller: Server Manager → Tools → ADSI Edit → right-click ADSI Edit → Connect to… → Default naming context → OK → expand the domain → right-click CN=System → New → Object… → class container → value System Management → Finish.
Then give the site server full control of it. In an elevated PowerShell on the domain controller:
dsacls --% "CN=System Management,CN=System,DC=YourDomain,DC=com" /I:T /G YourDomain\CM01$:GAThree things about that command, because each cost me time:
- Use
dsacls, notSet-Acl.Set-Aclon theAD:provider fails with a misleading "Access is denied", even for a Domain Admin, because it also tries to write the system access control list. - The
--%is needed. Without it, PowerShell reads$:inYourDomain\CM01$:GAand breaks the string. Single quotes also work. - Run it elevated (right-click PowerShell → Run as administrator). A non-elevated session shows Domain Admins as "Group used for deny only": every read works and every write fails, which is the most confusing result possible.
Build the site server
Windows Server 2025 with Desktop Experience, and three disks. Separate disks make troubleshooting much easier later:
| Drive | Size | Purpose | Allocation unit |
|---|---|---|---|
| C: | 100 GB | Operating system and the Configuration Manager install | default |
| D: | 60 GB | SQL data, log and tempdb | 64K |
| E: | 200 GB | Content library, source files, WSUS content | 4K |
Set the allocation unit when you format the disk: Server Manager → Tools → Computer Management → Storage → Disk Management → right-click the unallocated space → New Simple Volume → page Format Partition → Allocation unit size: 64K. It is the standard recommendation for SQL and costs nothing now.
On E:, create the folders now, so every later step has a clear place to write to:
E:\Sources\Applications
E:\Sources\OSD\Images
E:\Sources\OSD\Drivers
E:\Sources\Updates
E:\SCCMContentLib
E:\WSUS
Share E:\Sources as Sources$: File Explorer → right-click E:\Sources → Properties → tab Sharing → Advanced Sharing → tick Share this folder → share name Sources$. The $ hides the share from browsing. Its permissions come up again and again later; the final list is at the end of this guide.
Use the right ADK version
This is the most common reason a site install fails at the prerequisite check, and the error does not say it clearly.
Configuration Manager supports only specific Windows ADK versions and refuses newer ones. For the 2509 and 2603 releases that is 10.1.26100.2454, not the 10.1.28000.1 that Microsoft offers first. Install Deployment Tools and User State Migration Tool (USMT), then the Windows PE add-on with exactly the same version.
The installer has two traps:
adksetup.exeis a small starter that runs in the background, so/quietreturns at once and tells you nothing. Download the full files first and run the local copy, where you can see what happens:
adksetup.exe /layout C:\Install\ADK- Do not start the Windows PE add-on until the main ADK has really finished. If both run together, the add-on stops without a message, and you only find out much later when a boot image cannot be built.
To check afterwards, look in the 32-bit registry hive. The 64-bit one shows a false failure:
Get-ItemProperty 'HKLM:\SOFTWARE\WOW6432Node\Microsoft\Windows Kits\Installed Roots' |
  Select-Object KitsRoot10
SQL Server
Developer edition, default instance. Most settings are in the SQL Server setup wizard; one of them can never be changed later without rebuilding the site:
| Setting | Value | Where |
|---|---|---|
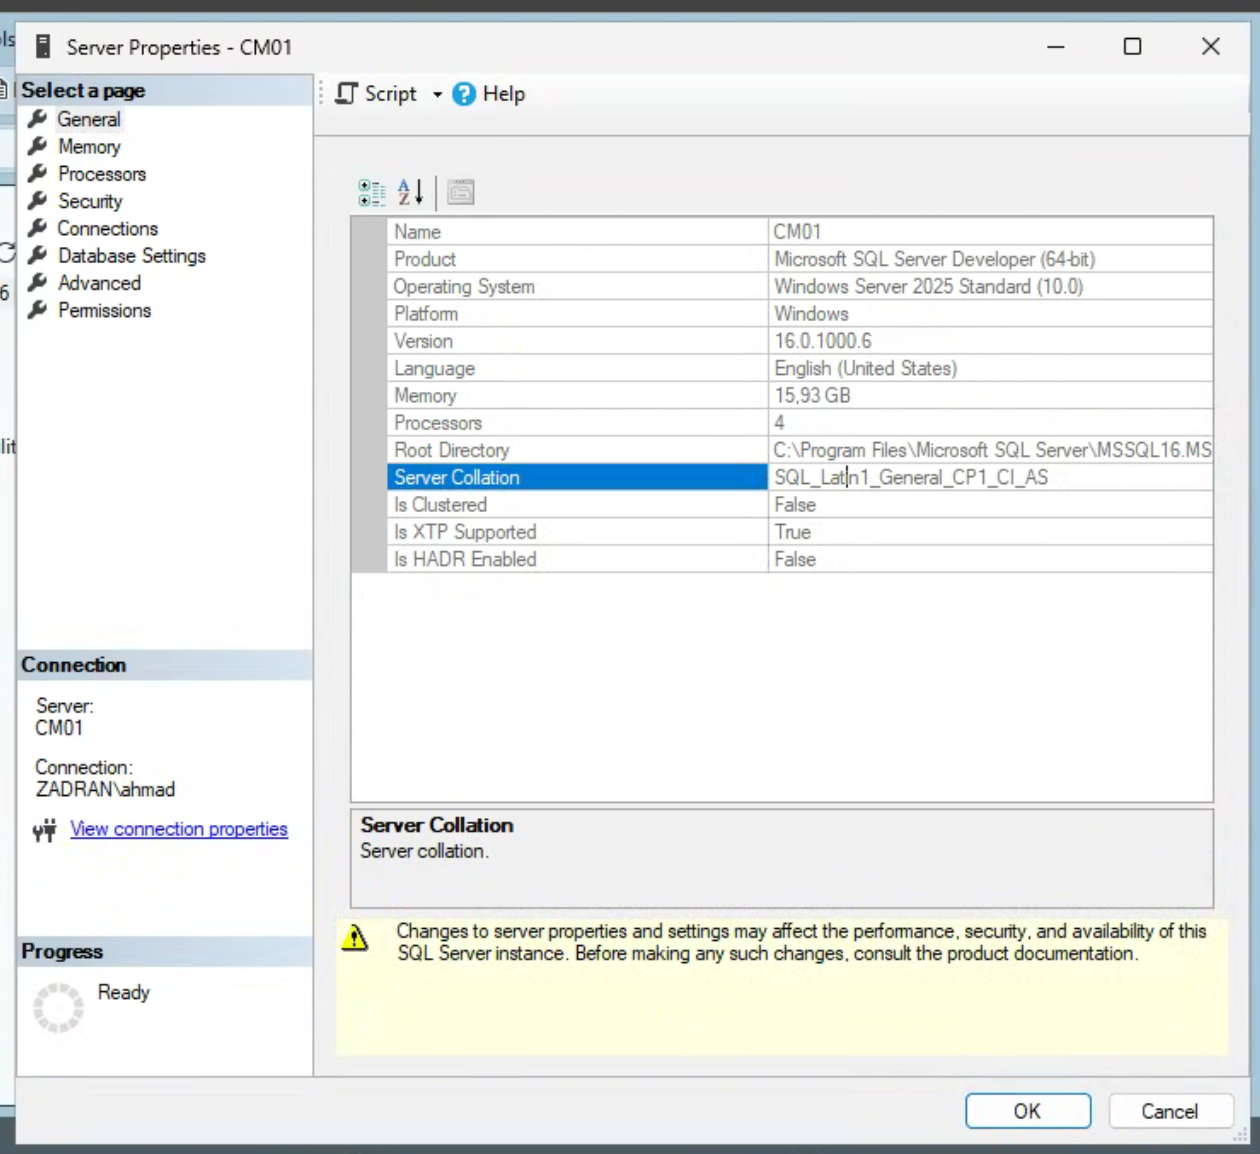
| Collation | SQL_Latin1_General_CP1_CI_AS -- required, not a preference |
Setup → Server Configuration → tab Collation → Customize |
| Authentication | Windows only | Setup → Database Engine Configuration → tab Server Configuration |
| tempdb | 4 data files plus log, 512 MB each | Setup → Database Engine Configuration → tab TempDB |
| max server memory | 8192 MB on a 16 GB host | Setup → Database Engine Configuration → tab Memory, or later in SSMS: right-click the server → Properties → page Memory |
| MAXDOP | 4 | Setup → tab MaxDOP, or later in SSMS: Properties → page Advanced → Max Degree of Parallelism |
Without a memory limit, SQL fights the site, IIS and the distribution point for memory on the same machine. Set it.
Two more ticks in setup → Server Configuration → tab Service Accounts:
- Grant Perform Volume Maintenance Task privilege to SQL Server Database Engine Service, so growing data files are not filled with zeros first.
- SQL Server Agent → Startup Type Automatic.
Then check the service principal names before you continue. In PowerShell on the site server:
setspn -L CM01You want both MSSQLSvc/cm01.YourDomain.com:1433 and MSSQLSvc/cm01.YourDomain.com.
SQL Server Management Studio is a separate download. On the first connect it rejects the self-signed certificate: in the Connect to Server window, tick Trust Server Certificate.
Install the primary site
Run splash.hta from the installation media → Install and go through the wizard. It is long, but there are no surprises if the prerequisites are right.
When it finishes, check instead of assuming. In PowerShell on the site server:
Get-ItemProperty 'HKLM:\SOFTWARE\Microsoft\SMS\Setup' | Select-Object 'Full Version'

Get-Service SMS_EXECUTIVE, SMS_SITE_COMPONENT_MANAGER, SMS_NOTIFICATION_SERVER,
            MSSQLSERVER, W3SVC | Select-Object Name, Status
Then open this address in a browser on the site server. It proves more than any green tick in the console:
http://CM01/sms_mp/.sms_aut?mplistA short XML answer (HTTP 200) means the management point works and can talk to the database.
Reading status messages
Monitoring → Overview → System Status → Component Status will almost certainly show one error from the install, usually SMS Executive detected that this component stopped unexpectedly. Right-click the component → Show Messages → All and check the time. If it is from before setup finished, it happened while the site was starting up and is not a fault. Right-click the component → Reset Counts → All and continue.
If you look for errors in WMI instead of the console: SMS_StatusMessage.Severity is unsigned in this namespace.
| Severity | Value |
|---|---|
| Informational | 1073741824 |
| Warning | 2147483648 |
| Error | 3221225472 |
A filter written with the signed numbers matches nothing, without any warning, and gives you a false "no errors". I lost an evening trusting one.
Update before you build anything on it
Install the current release before you add roles or clients, so every client you install later already has the right version.
- Take a hypervisor snapshot first (Proxmox: the VM → Snapshots → Take Snapshot). Site upgrades are reliable, but this is the one moment where a bad result costs a lot.
- Administration → Overview → Updates and Servicing → right-click the newest update → Run prerequisite check, wait until the State column says it passed.
- Right-click it again → Install Update Pack. Follow it under Monitoring → Overview → Updates and Servicing Status.
Boundaries and discovery
A boundary tells the site which machines belong to it. Without one, clients install and then stay unassigned, which looks exactly like a broken client.
1. Create the boundary. Administration → Overview → Hierarchy Configuration → Boundaries → ribbon Create Boundary → Type: IP address range:
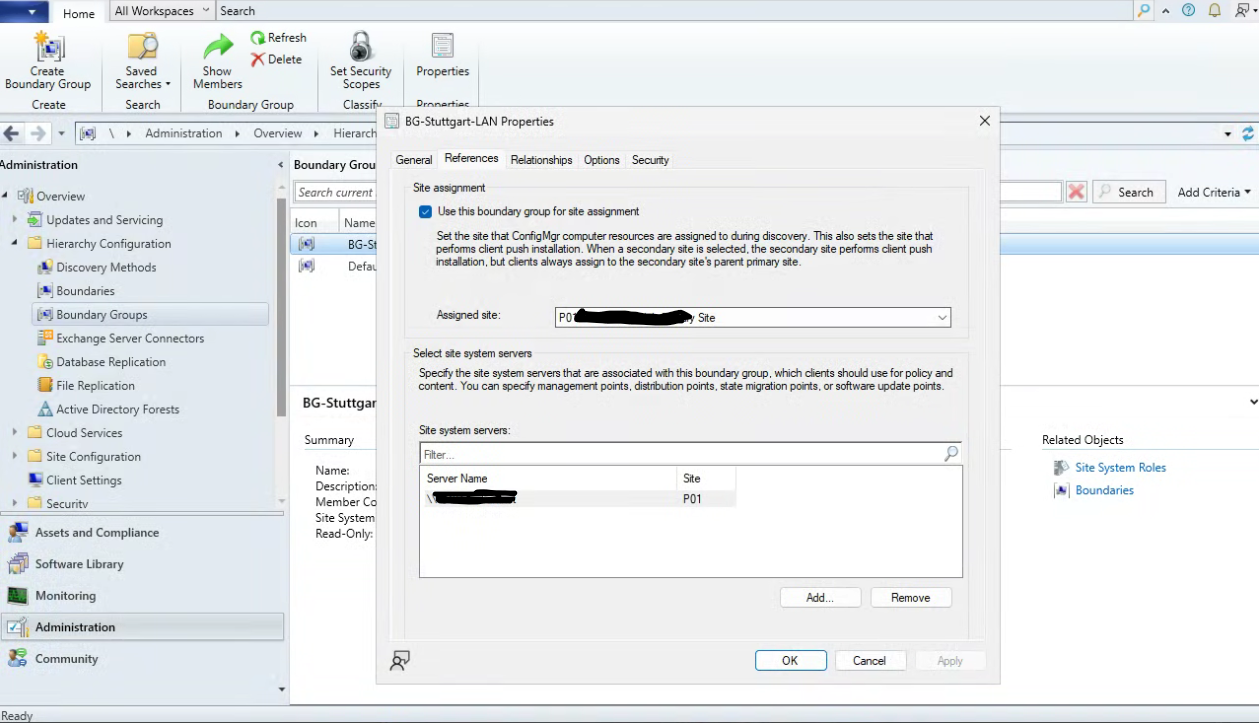
192.168.1.1-192.168.1.2542. Create the boundary group. Administration → Overview → Hierarchy Configuration → Boundary Groups → ribbon Create Boundary Group:
- Tab General → Add → select the boundary you just made.
- Tab References → tick Use this boundary group for site assignment → under Site system servers → Add → tick your site server.
You need both: site assignment tells a client which site it belongs to, and the site system tells it where to get content.
3. Turn on discovery. Administration → Overview → Hierarchy Configuration → Discovery Methods → double-click each method:
| Method | Settings |
|---|---|
| Active Directory System Discovery | Tick Enable → star icon (New) → Browse → pick only your lab OUs. Tab Polling Schedule → Schedule → every 1 day |
| Active Directory User Discovery | Tick Enable, same OU limit and schedule |
| Active Directory Forest Discovery | Tick Enable, untick both "Automatically create … boundaries" options |
| Heartbeat Discovery | Tick Enable, every 1 day |
One day instead of the default week, so the lab reacts while you are still working on it.
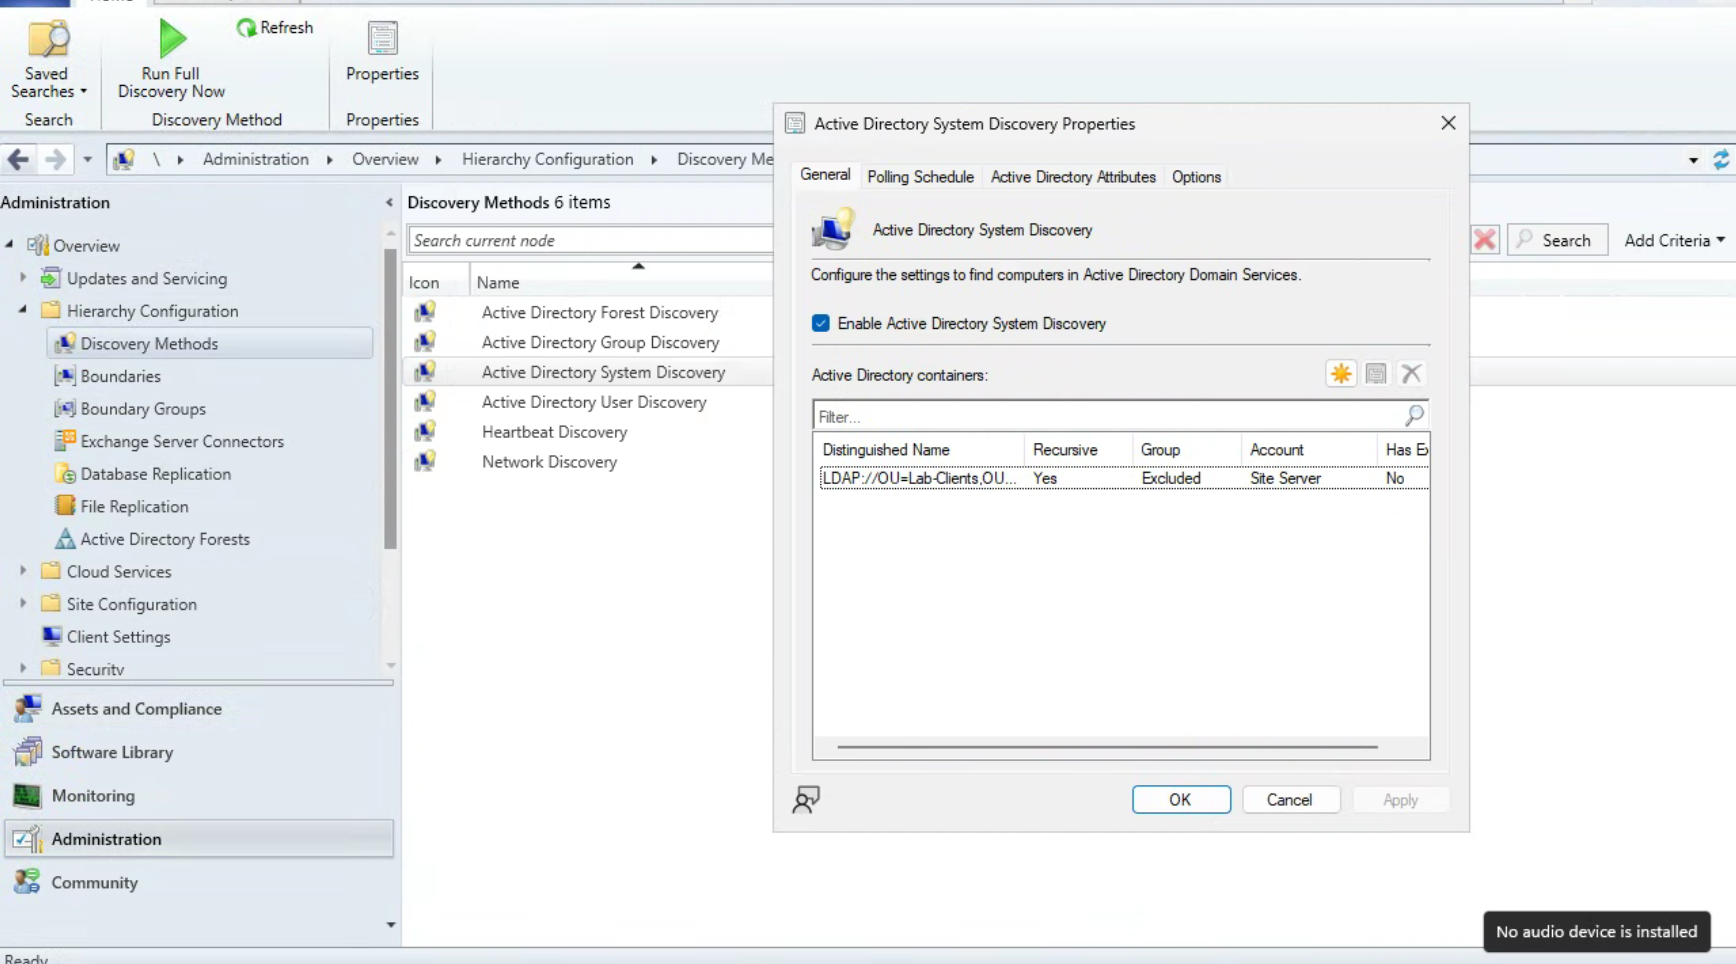
The proof that it worked is in ddm.log on the site server (the folder is shown under The logs at the end):
==>Assigning to site <P01>. Discovery property <IP Ranges> matches (192.168.1.1-192.168.1.254)A trap that wastes an afternoon
CcmExec running on the site server does not mean the client is installed.
That service belongs to the management point and runs from C:\Program Files\SMS_CCM. There is no C:\Windows\CCM and no root\ccm\SMS_Client namespace. Configuration Manager never installs the client on the site server by itself, and its device record shows IsClient = False until you install it.
Clients, and the first identity failure
Install the client on the site server first: Assets and Compliance → Overview → Devices → right-click the site server → Install Client → finish the wizard. It is the safest test: everything is local, both sides log on the same machine, and nothing important is at risk.
Then push to a real client the same way, and meet the problem that runs through this whole project. The push failed. On the site server, ccm.log showed:
Attempting to connect to administrative share \\W11-01\admin$ using machine account.
NetUseAdd failed: 5
ERROR: Failed to connect to the \\W11-01\admin$ share using account Machine Account
Error 5 means access denied, not path not found. Network, DNS and firewall were fine. The target answered and said no.
Client push logs in as CM01$, the computer account of the site server, and that account is not a local administrator on the target. Configuration Manager does not give itself that right.
This is what makes the lesson stick: I tested \\W11-01\admin$ by hand from the site server and it worked, because my session was a Domain Admin, a completely different identity from the one push uses. A successful manual test proved nothing.
The fix
Use a normal domain user, not a Domain Admin, that is local administrator on the targets:
- Create the account. Server Manager → Tools → Active Directory Users and Computers → right-click your service accounts OU → New → User →
svc_cm_push→ tick Password never expires. - Make it local admin on every client — with Group Policy, see below.
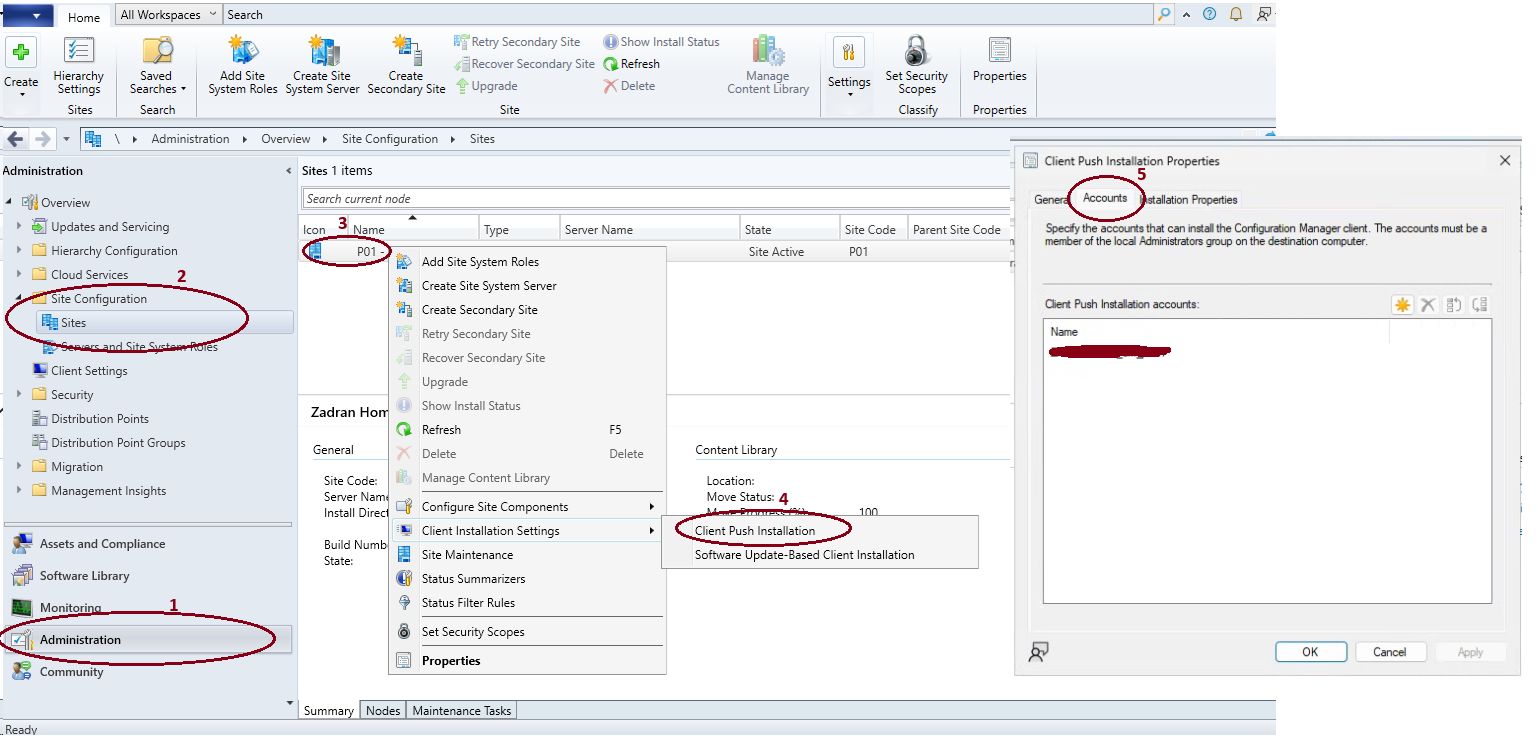
- Tell Configuration Manager about it. Administration → Overview → Site Configuration → Sites → click your site → ribbon Client Installation Settings → Client Push Installation:
- tab Accounts → star icon → New Account →
YourDomain\svc_cm_push; - tab General → leave Enable automatic site-wide client push installation unticked.
- tab Accounts → star icon → New Account →
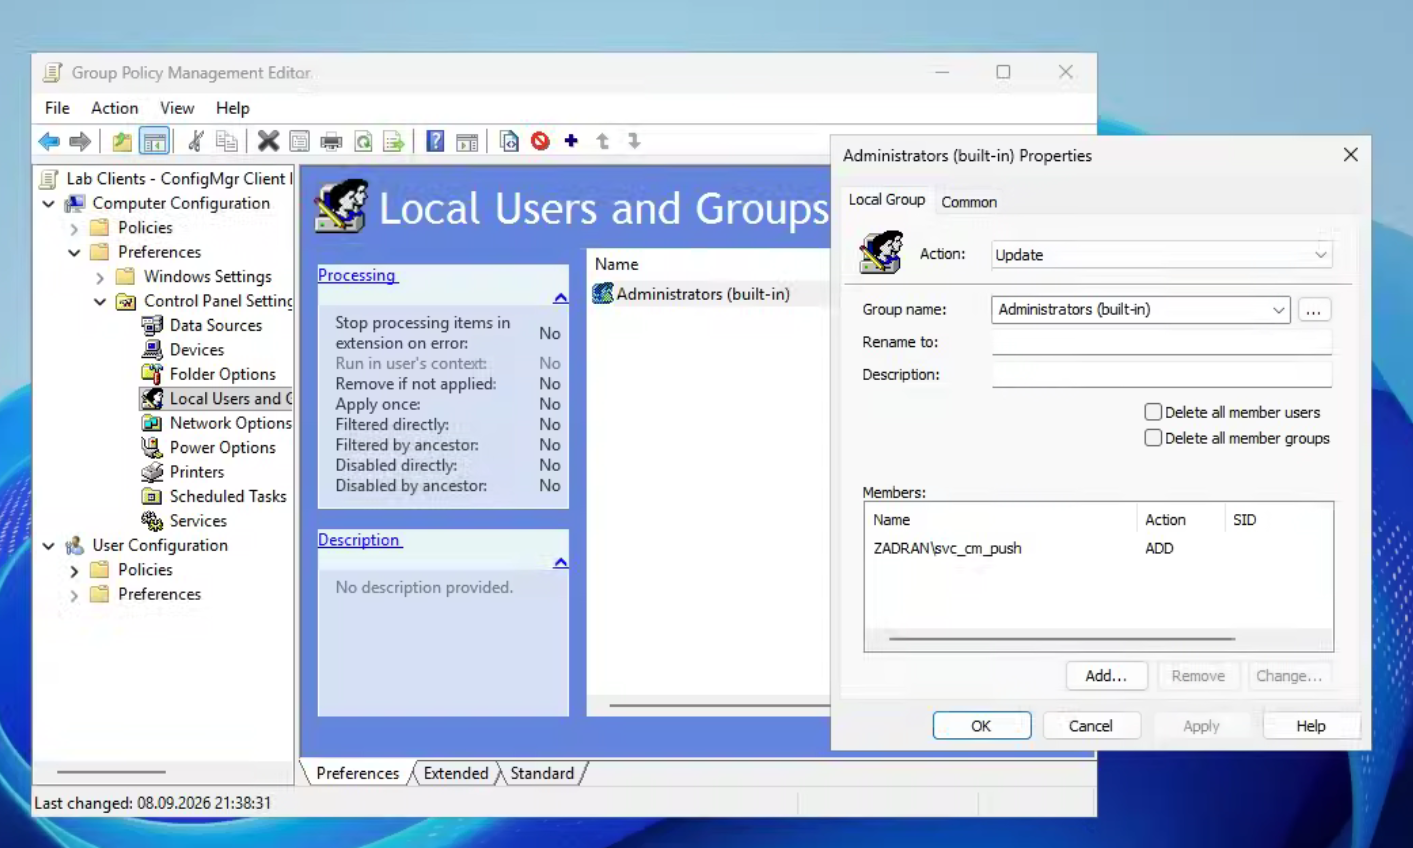
Do step 2 and the firewall rules with Group Policy, not by hand, because a machine built over the network later has nobody logged on to fix it. On a domain controller: Server Manager → Tools → Group Policy Management → right-click the lab clients OU → Create a GPO in this domain, and Link it here → name it → right-click it → Edit:
- Computer Configuration → Preferences → Control Panel Settings → Local Users and Groups → right-click → New → Local Group → Action Update, Group name Administrators (built-in) → Members → Add →
YourDomain\svc_cm_push. - Computer Configuration → Policies → Windows Settings → Security Settings → Windows Defender Firewall with Advanced Security → Windows Defender Firewall with Advanced Security → Inbound Rules → right-click → New Rule → Predefined: File and Printer Sharing → tick all → Allow. Repeat with Predefined: Windows Management Instrumentation (WMI).
This GPO is what makes unattended deployment possible later. Build it properly now.
Two log lines that look like failures and are not
Unable to connect to remote machine ... namespace root\ccm ... error 0x8004100eInvalid namespace. Correct: root\ccm only exists after a client is installed. It is just the pre-check.
NTLM fallback is not enabled, remote machine ... is not continuing with client pushBadly worded. It is only about that WMI check; the push continues on the next line.
Applications, and what actually decides success
Creating an application does nothing by itself. There are three steps, and if you miss one you get no error anywhere:
- Create: Software Library → Overview → Application Management → Applications → ribbon Create Application.
- Distribute: right-click the application → Distribute Content → add your distribution point.
- Deploy: right-click the application → Deploy → choose a collection.
The second identity failure
Content distribution failed. The console said the source folder did not exist. distmgr.log on the site server was more exact:
The source directory \\cm01.YourDomain.com\Sources$\Applications\rustdesk\ doesn't exist
or the SMS service cannot access it, Win32 last error = 5
Access denied again, and again the path worked fine from my own session.
When SYSTEM on a server opens a UNC path back to the same server, it arrives as NT AUTHORITY\SYSTEM, the local SYSTEM account, not as the domain computer account. That matched neither Domain Users nor Domain Computers on the share. In an elevated PowerShell on the site server:
Grant-SmbShareAccess -Name 'Sources$' -AccountName 'NT AUTHORITY\SYSTEM' -AccessRight Read -ForceTest as the identity that actually matters
This answers the general question "it works when I test it, so why does the service say access denied?": run the test as SYSTEM. In an elevated PowerShell on the site server:
$a = New-ScheduledTaskAction -Execute 'cmd.exe' `
     -Argument '/c dir "\\cm01.YourDomain.com\Sources$\Applications" > C:\systest.txt 2>&1'
$p = New-ScheduledTaskPrincipal -UserId 'SYSTEM' -LogonType ServiceAccount -RunLevel Highest
Register-ScheduledTask -TaskName SysTest -Action $a -Principal $p -Force | Out-Null
Start-ScheduledTask -TaskName SysTest; Start-Sleep 6; Get-Content C:\systest.txt
Unregister-ScheduledTask -TaskName SysTest -Confirm:$false
Detection methods, not exit codes
The most important thing about application deployment. The fastest way to learn it is to break it on purpose:
- Software Library → Overview → Application Management → Applications → right-click a working application → Copy.
- Right-click the copy → Properties → tab Deployment Types → select the deployment type → Edit → tab Detection Method → Edit Clause → change the rule to something that can never be true, such as a file path that does not exist.
- Deploy it as Required.
AppEnforce.log on the client:
Matched exit code 0 to a Success entry in exit codes table.
+++ Application not discovered.
On the client, Start → Software Center → Installation status shows 0x87D00324 and Past due - will be retried.
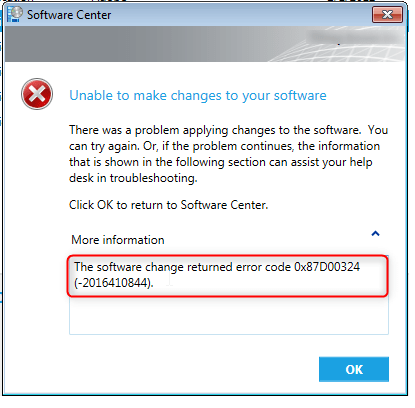
Configuration Manager does not trust the exit code. After running the install command, it runs detection again, and detection decides. An installer can report full success and the deployment still fails. A required deployment with a bad detection rule silently reinstalls on every evaluation cycle.
Install beats uninstall
Deploy an application with action Uninstall while an install deployment for the same application still targets that machine, and nothing happens: no error, no progress, zero percent forever.
AppIntentEval.log on the client says why, if you know the words:
RequiredApplication_...   :- Current State = Compliant,    ConfigureState = NotNeeded
ProhibitedApplication_... :- Current State = NonCompliant, ConfigureState = NotNeeded
Application_...           :- ResolvedState = Available
ProhibitedApplication is the uninstall. The client agrees the machine is non-compliant and sets ConfigureState = NotNeeded: I know this is wrong and I choose not to fix it, because the install deployment is still active.
ConfigureState is the first field to read whenever a deployment stays at zero percent. NotNeeded means the client will not act, however non-compliant it looks.
The fix is to take the machine out of the install collection: Assets and Compliance → Overview → Device Collections → right-click the install collection → Properties → tab Membership Rules → remove the machine, or Add Rule → Exclude Collections. Deleting the install deployment also works, but only once the client gets the change. Send it now: Assets and Compliance → Overview → Devices → right-click the machine → Client Notification → Download Computer Policy.
Software updates, and two findings that cost a week
This is where the lab stopped being a tutorial and started teaching me things.
Install WSUS, then never open it again
Configuration Manager uses WSUS in the background as a catalogue of updates and controls it completely. Use SQL instead of the Windows Internal Database, so there is only one database engine to look after. In an elevated PowerShell on the site server:
Install-WindowsFeature UpdateServices-Services,UpdateServices-DB -IncludeManagementTools
cd "C:\Program Files\Update Services\Tools"
.\wsusutil.exe postinstall SQL_INSTANCE_NAME="CM01" CONTENT_DIR=E:\WSUS
For a default SQL instance the instance name is just the server name, with no backslash.
If the post-install fails at the very last step with a System.Security.SecurityException, do not uninstall anything. The database, folders and service were created. Reboot and run the same command again; it is safe to repeat and usually works the second time.
Then two changes, in the same PowerShell, that prevent problems that are very hard to find later:
Import-Module WebAdministration
Set-ItemProperty 'IIS:\AppPools\WsusPool' -Name recycling.periodicRestart.privateMemory -Value 0
Set-ItemProperty 'IIS:\AppPools\WsusPool' -Name queueLength -Value 2000
Restart-WebAppPool -Name WsusPool

New-NetFirewallRule -DisplayName "WSUS HTTP 8530"  -Direction Inbound -Protocol TCP -LocalPort 8530 -Action Allow
New-NetFirewallRule -DisplayName "WSUS HTTPS 8531" -Direction Inbound -Protocol TCP -LocalPort 8531 -Action Allow
The WSUS application pool has a memory limit of about 1.8 GB, and WSUS often goes over it. IIS then restarts the pool in the middle of a scan, and clients fail with timeouts that look exactly like network problems. Zero means no limit, which is what Microsoft recommends.
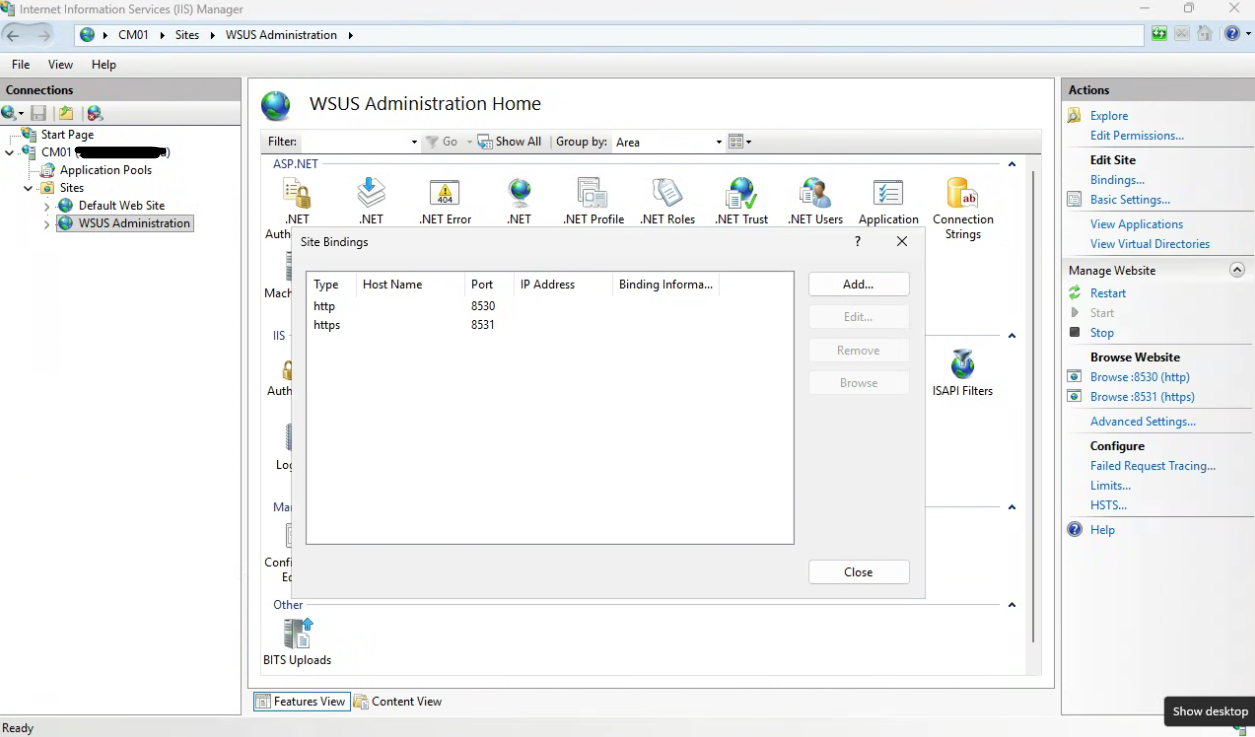
WSUS uses ports 8530 and 8531, not 80 and 443.
Add the Software Update Point and choose products:
- Add the role: Administration → Overview → Site Configuration → Servers and Site System Roles → right-click your site server → Add Site System Roles → tick Software Update Point → finish the wizard.
- Sync once to get the product list: Software Library → Overview → Software Updates → All Software Updates → ribbon Synchronize Software Updates.
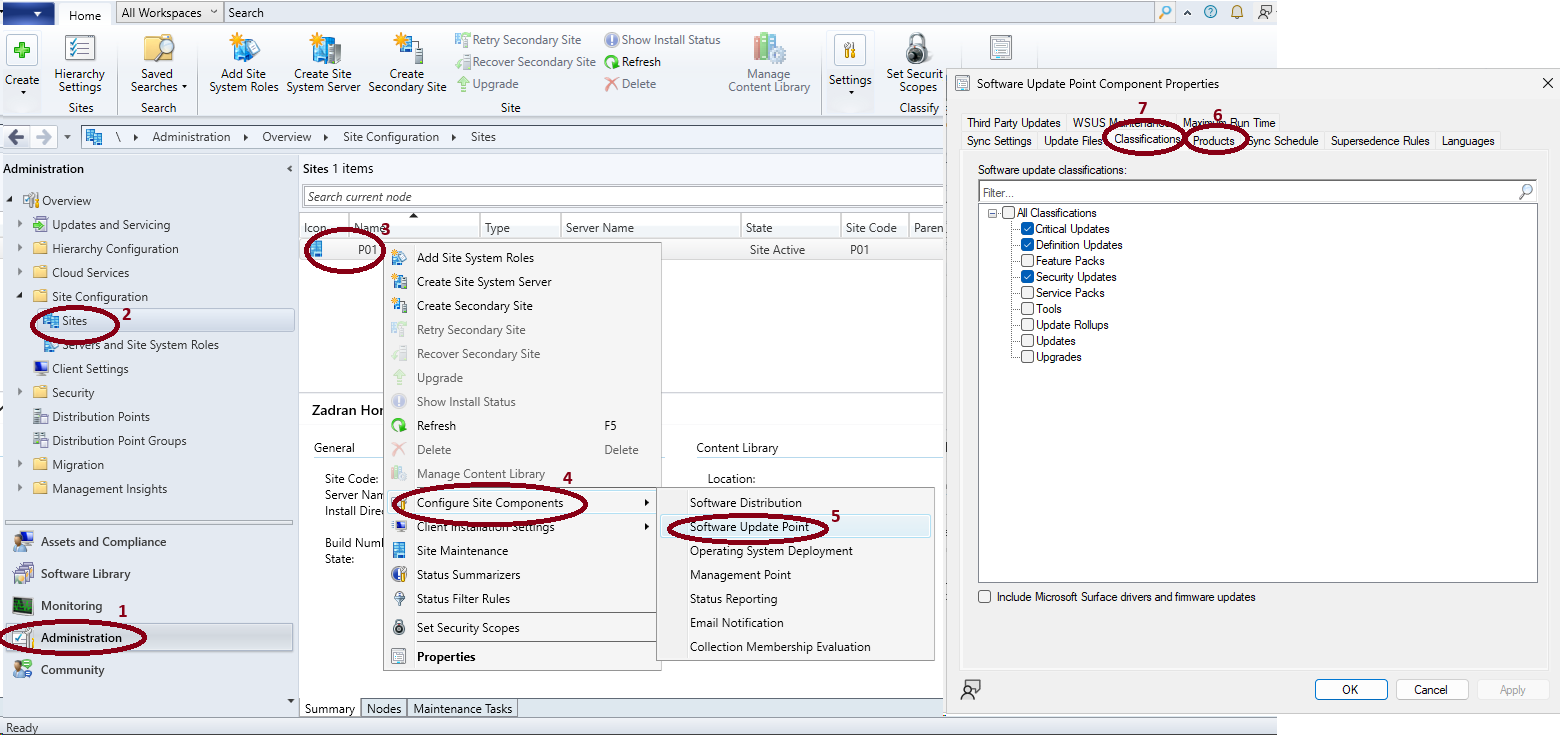
- Choose products: Administration → Overview → Site Configuration → Sites → click your site → ribbon Configure Site Components → Software Update Point → tab Products and tab Classifications. The list loads only when the window opens, so after a sync close it and open it again.
- Sync again (step 2), so the updates for those products arrive.
Finding one: a client with internet access never needs anything
Everything looked healthy, but the console showed zero updates required by any machine. It looks broken, but it is not.
Setting the update server does not stop Windows from going directly to Microsoft for drivers and Defender definitions, and unless you turn it off, for quality updates too. The lab clients had been updating themselves since the day they were built, so Configuration Manager really had nothing to install.
See it yourself. On a client, in an elevated PowerShell, delete the Defender definitions:
& "$env:ProgramFiles\Windows Defender\MpCmdRun.exe" -RemoveDefinitions -All
Get-MpComputerStatus | Select-Object AntivirusSignatureVersion
It shows 0.0.0.0. Wait five minutes, and the definitions are back, from Microsoft, without asking. In a company, that means machines update without your server, and your reports show healthy machines you did not update.
The fix belongs in Group Policy, not in a registry change on one machine: that is lost when the machine is rebuilt and does not apply to the next one.
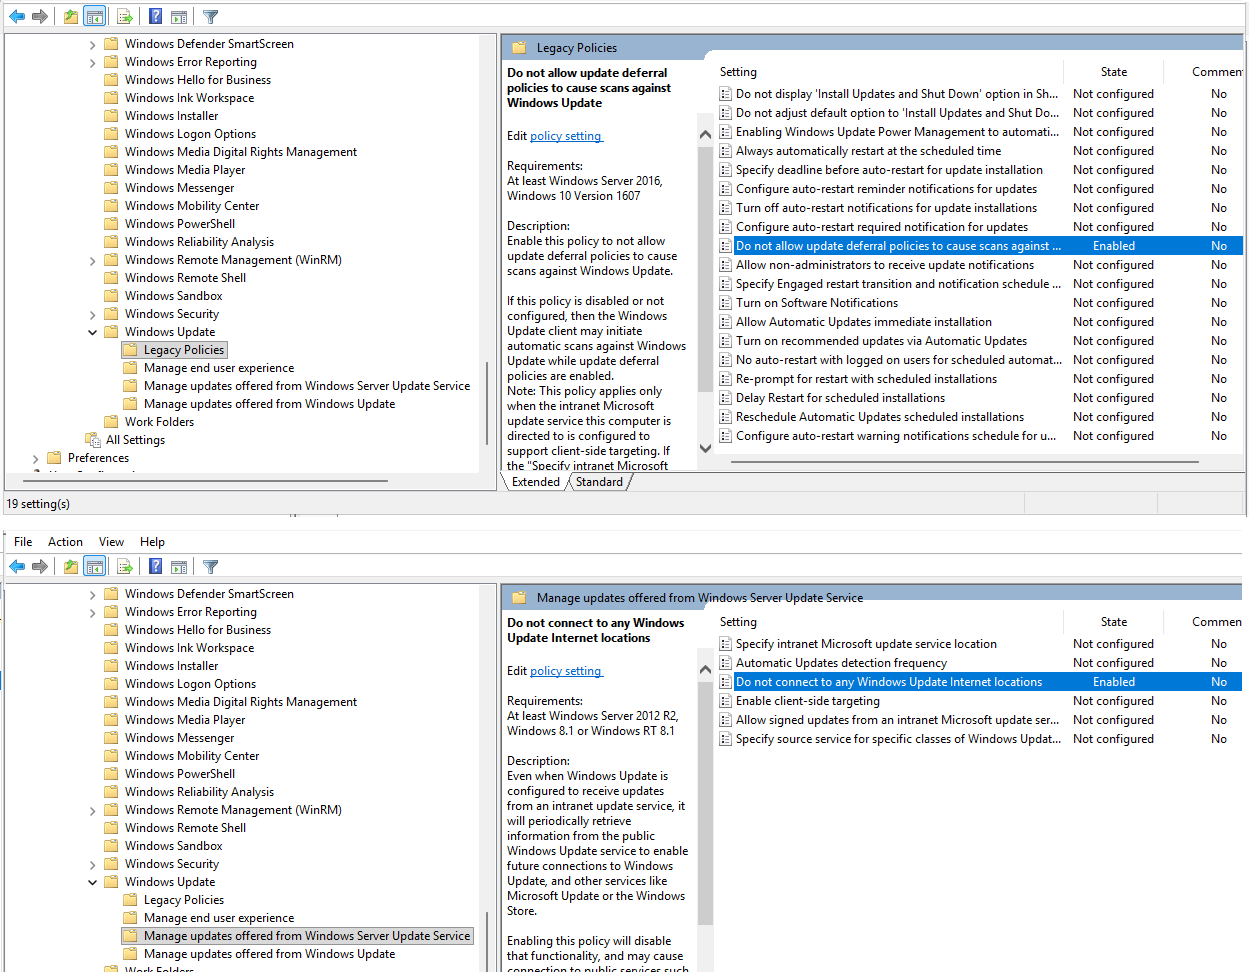
On a domain controller: Server Manager → Tools → Group Policy Management → right-click the OU that holds your clients → Create a GPO in this domain, and Link it here → name it → right-click it → Edit. Then Computer Configuration → Policies → Administrative Templates → Windows Components → Windows Update. The two settings are in different sub-folders:
| Sub-folder | Setting | Value |
|---|---|---|
| Manage updates offered from Windows Server Update Service | Do not connect to any Windows Update Internet locations | Enabled |
| Legacy Policies | Do not allow update deferral policies to cause scans against Windows Update | Enabled |
The second closes a gap called dual scan, where Windows checks Microsoft anyway. In current ADMX files it is under Legacy Policies; if you only look in the WSUS folder, it seems not to exist.
Do not set Specify intranet Microsoft update service location here. Configuration Manager writes that value itself, and a policy with the same value works against it. An old GPO pointing to an update server that no longer exists is a classic, almost invisible update failure, so check for one first. In PowerShell on a domain controller:
Get-GPO -All | ForEach-Object {
  $r = Get-GPOReport -Guid $_.Id -ReportType Xml
  if ($r -match 'WUServer|WindowsUpdate') { $_.DisplayName }
}
For Defender, in the same GPO editor: Computer Configuration → Policies → Administrative Templates → Windows Components → Microsoft Defender Antivirus → Security Intelligence Updates:
| Setting | Value |
|---|---|
| Define the order of sources for downloading security intelligence updates | Enabled, value InternalDefinitionUpdateServer |
| Define file shares for downloading security intelligence updates | Not Configured |
| Allow security intelligence updates from Microsoft Update | Disabled |
Leave the file-shares setting Not Configured. Enabling it with an empty box is not allowed, and its own help text says "not configured" already means an empty list.
Check on the client, both parts. In PowerShell on the client, after gpupdate /force:
Get-ItemProperty 'HKLM:\SOFTWARE\Policies\Microsoft\Windows\WindowsUpdate' |
  Select-Object WUServer, DoNotConnectToWindowsUpdateInternetLocations, DisableDualScan

Get-MpPreference | Select-Object SignatureFallbackOrder
The registry value is what the policy wrote; Get-MpPreference is what Defender accepted. If they differ, the policy arrived but is not active.
Now if you delete the definitions, they stay at 0.0.0.0. Your server is the only source, which is the whole point.
Finding two: "Required: 0" does not mean "not needed"
Software Library → Overview → Software Updates → All Software Updates showed Required: 0 for an update I knew the client was missing.
The clue is in the same list: Last Update: Never. That column is a summary report, built by a background task that runs every hour. Until that task has processed an update, the column shows zero and every machine shows as Unknown.
The true answer is on the client, in Configuration Manager's own scan results. In PowerShell on the client:
Get-WmiObject -Namespace root\ccm\SoftwareUpdates\UpdatesStore -Class CCM_UpdateStatus |
  Where-Object { $_.Status -eq 'Missing' } |
  Select-Object Article, Title, Status | Format-Table -AutoSize
While the console said zero, this showed sixteen missing updates.
When the console and the client disagree, the client is right. To refresh the report: All Software Updates → ribbon Run Summarization. You do not need to wait for it; you can deploy without it.
Automate it with a deployment rule
Once one deployment has installed successfully, replace the manual work with an Automatic Deployment Rule. On a schedule, it finds matching updates, groups them, downloads the content and deploys it. Create it under Software Library → Overview → Software Updates → Automatic Deployment Rules → ribbon Create Automatic Deployment Rule.
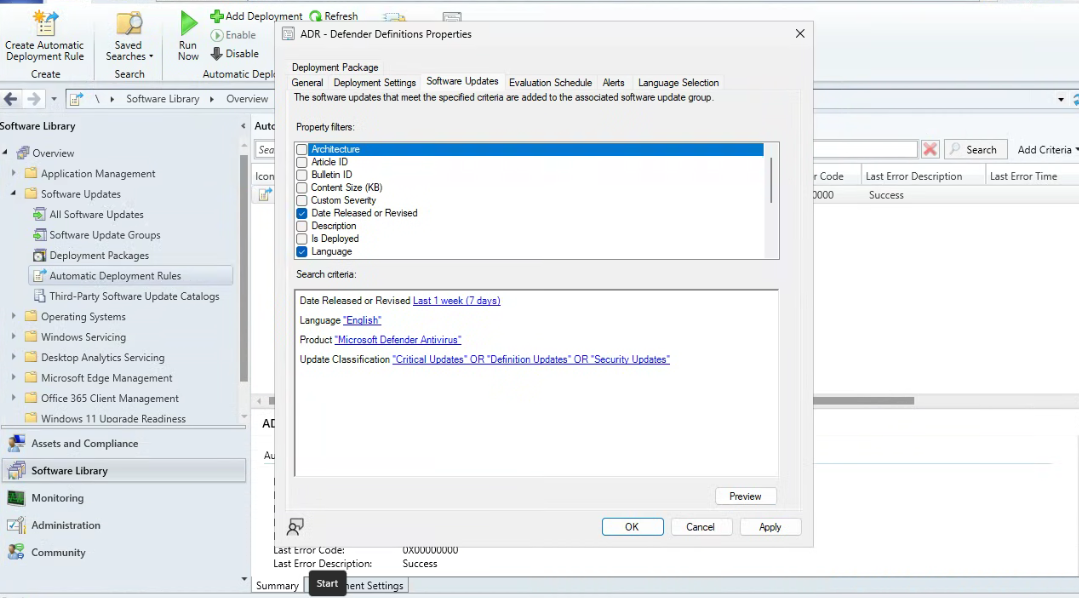
Two settings decide if it does anything useful. Both are in the rule's properties: Software Library → Overview → Software Updates → Automatic Deployment Rules → right-click your rule → Properties.
- Tab Evaluation Schedule: select "Run the rule after any software update point synchronization". The sync brings in new updates, and the rule runs right after it.
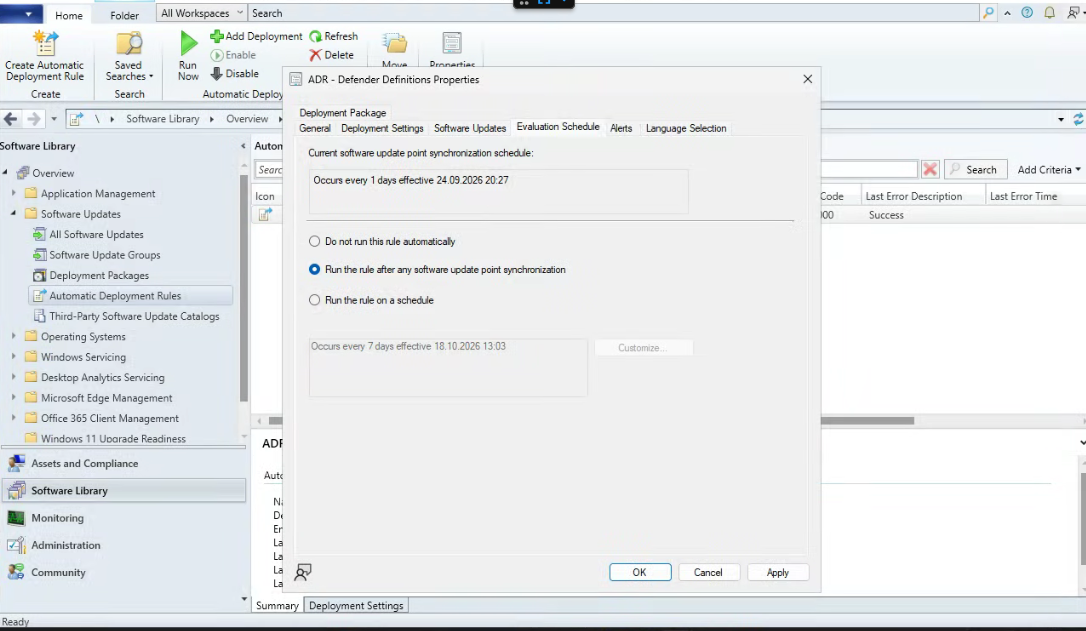
- Tab Software Updates: check the "Date Released or Revised" filter. It must fit how often your sync runs. Mine found nothing on its first run: the filter said "Last 1 day", but the sync ran once a week, so the catalogue was almost always older than a day. A daily filter needs a daily sync; with a weekly sync, use "Last 1 week" or longer.
Deploying Windows over the network
The last part, and the best one.
Three things to fix first
Each of these fails late, with an unclear message, at a moment when nobody is logged on to fix it.
1. DHCP must give out a domain controller as DNS server. A machine built over the network gets its DNS from DHCP. If that DNS server cannot answer Active Directory queries, the build fails at the domain join. In your DHCP server (Windows: Server Manager → Tools → DHCP → your server → IPv4 → Scope → Scope Options → right-click → Configure Options → 006 DNS Servers; pfSense: Services → DHCP Server → LAN → DNS Servers), set your domain controller and nothing else. Windows does not use a second DNS server as a backup the way people expect; a second entry that cannot answer AD queries causes random failures. Let the domain controller forward everything else to your normal DNS server.
2. A separate account for joining the domain, svc_cm_djoin, with no group memberships. Create it in Active Directory Users and Computers, then give it rights only on the OU where new machines go: right-click the OU → Delegate Control → Next → Add svc_cm_djoin → Next → Create a custom task to delegate → Only the following objects in the folder → tick Computer objects, plus Create selected objects in this folder and Delete selected objects in this folder → Next → tick Full Control → Finish. The alternative, a Domain Admin password in the task sequence, can be read by anyone who can read the task sequence.
3. Distribute the boot images. Software Library → Overview → Operating Systems → Boot Images → right-click Boot Image (x64) → Distribute Content → add your distribution point. Check it under Monitoring → Overview → Distribution Status → Content Status: it must show Success. Until then it shows Targeted 0, and network boot cannot send what the distribution point does not have.
Turn on PXE
Administration → Overview → Distribution Points → right-click your distribution point → Properties → tab PXE:
| Setting | Value |
|---|---|
| Enable PXE support for clients | Ticked |
| Allow this distribution point to respond to incoming PXE requests | Ticked |
| Enable a PXE responder without Windows Deployment Service | Ticked |
| Enable unknown computer support | Ticked |
| PXE server response delay | 0 |
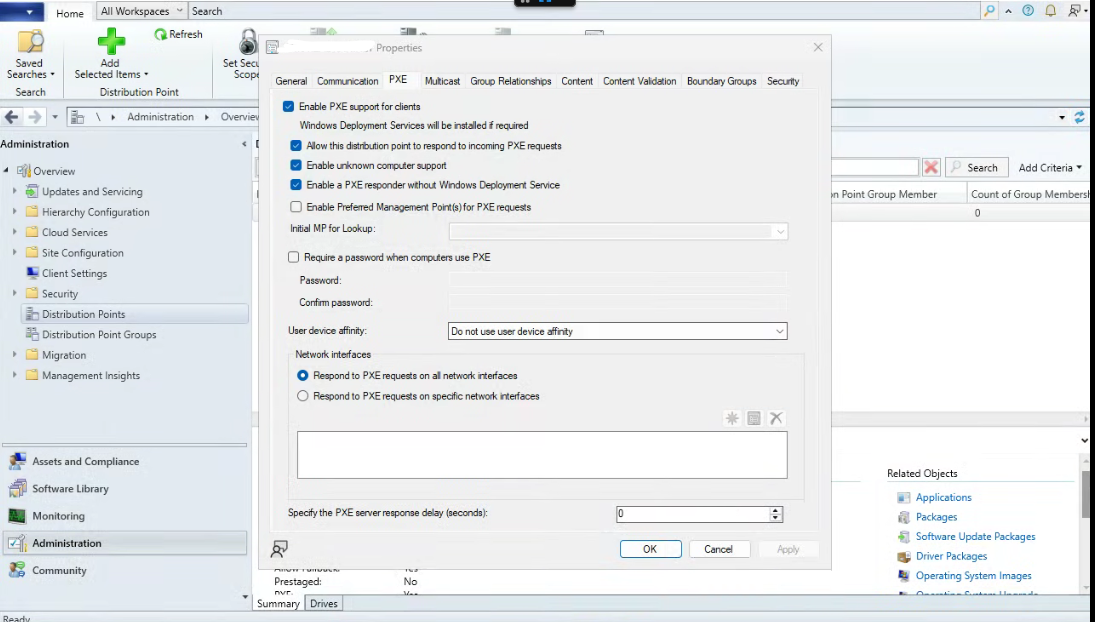
Enable unknown computer support lets you build a machine the site has never seen. Without it, a new empty laptop gets no answer at all.
You get a warning that Windows Deployment Services will be installed. Accept it. Because the responder box is ticked, Configuration Manager installs WDS, stops and disables it right away, and uses the ports itself. SMSPXE.log on the site server shows it:
Start SCCM PXE as a service.
Waiting for WDS to stop ...
WDS has stopped.
Disabled WDS.
--- Starting DHCP on ... 192.168.1.22, 67.
--- Starting PXE on ... 192.168.1.22, 4011.
--- Starting TFTP on 192.168.1.22.
If your machines are in the same subnet as the distribution point, do not set DHCP options 66 and 67, and no IP helpers. PXE works by broadcast; those options only matter when PXE has to go through a router, and otherwise they usually break things.
Import a Windows image
Copy install.wim from the ISO to a permanent folder (not the mounted ISO, which disappears after a reboot). Then remove the read-only attribute: files copied from a mounted ISO keep it, and the import then fails with "Generic failure". In PowerShell on the site server:
Set-ItemProperty "$src\OSD\Images\Win11\install.wim" -Name IsReadOnly -Value $falseA retail wim contains every edition. Extract the one you want yourself instead of letting the wizard do it: the wizard hides every error behind the same "Generic failure", but DISM tells you what really went wrong:
Get-WindowsImage -ImagePath "$src\OSD\Images\Win11\install.wim" |
  Select-Object ImageIndex, ImageName | Format-Table -AutoSize

Dism /Export-Image /SourceImageFile:"$src\OSD\Images\Win11\install.wim" `
  /SourceIndex:6 /DestinationImageFile:"$src\OSD\Images\Win11-Pro\install.wim" `
  /Compress:max /CheckIntegrity
Then import the exported file: Software Library → Overview → Operating Systems → Operating System Images → ribbon Add Operating System Image, with the extract option unticked.
Two things about the path field in that wizard. It accepts only a UNC path (\\server\Sources$\...); a local path like E:\... is rejected, because the site needs a path it can reach as a service. And a share ending in $ is hidden and never appears when you browse, so type the full path into the box.
Build the task sequence
Software Library → Overview → Operating Systems → Task Sequences → ribbon Create Task Sequence → Install an existing image package. It creates the whole sequence (partition, apply image, drivers, domain join, client install); you can change any step later with right-click → Edit.
The five wizard pages that matter:
| Page | Setting |
|---|---|
| Task Sequence Information | Boot image: the x64 one |
| Install Windows | Your image, partition and format ticked, and always use the same administrator password |
| Configure Network | Join a domain, your OU, and svc_cm_djoin |
| Install Configuration Manager | The client package, properties SMSMP=cm01.YourDomain.com |
| Include Updates / Install Applications | Nothing on the first run |
About the administrator password: in production, make it random and disable the account. In a lab you want a local account to log in with when a build fails halfway and there is no domain account yet.
Leave updates and applications out of the first build. A basic build takes twenty minutes, with updates an hour. Get it working first, then add more.
Deploy it, carefully
Software Library → Overview → Operating Systems → Task Sequences → right-click your task sequence → Deploy:
| Page | Setting |
|---|---|
| General → Collection | All Unknown Computers |
| Deployment Settings → Purpose | Required |
| Deployment Settings → Make available to the following | Only media and PXE |
"Only media and PXE" is the most important setting here. This task sequence erases the disk. With that setting it can only run from a network boot and never appears in Software Center on a working machine. Choose "Configuration Manager clients" instead, and you have built a way to destroy a working PC with one click.
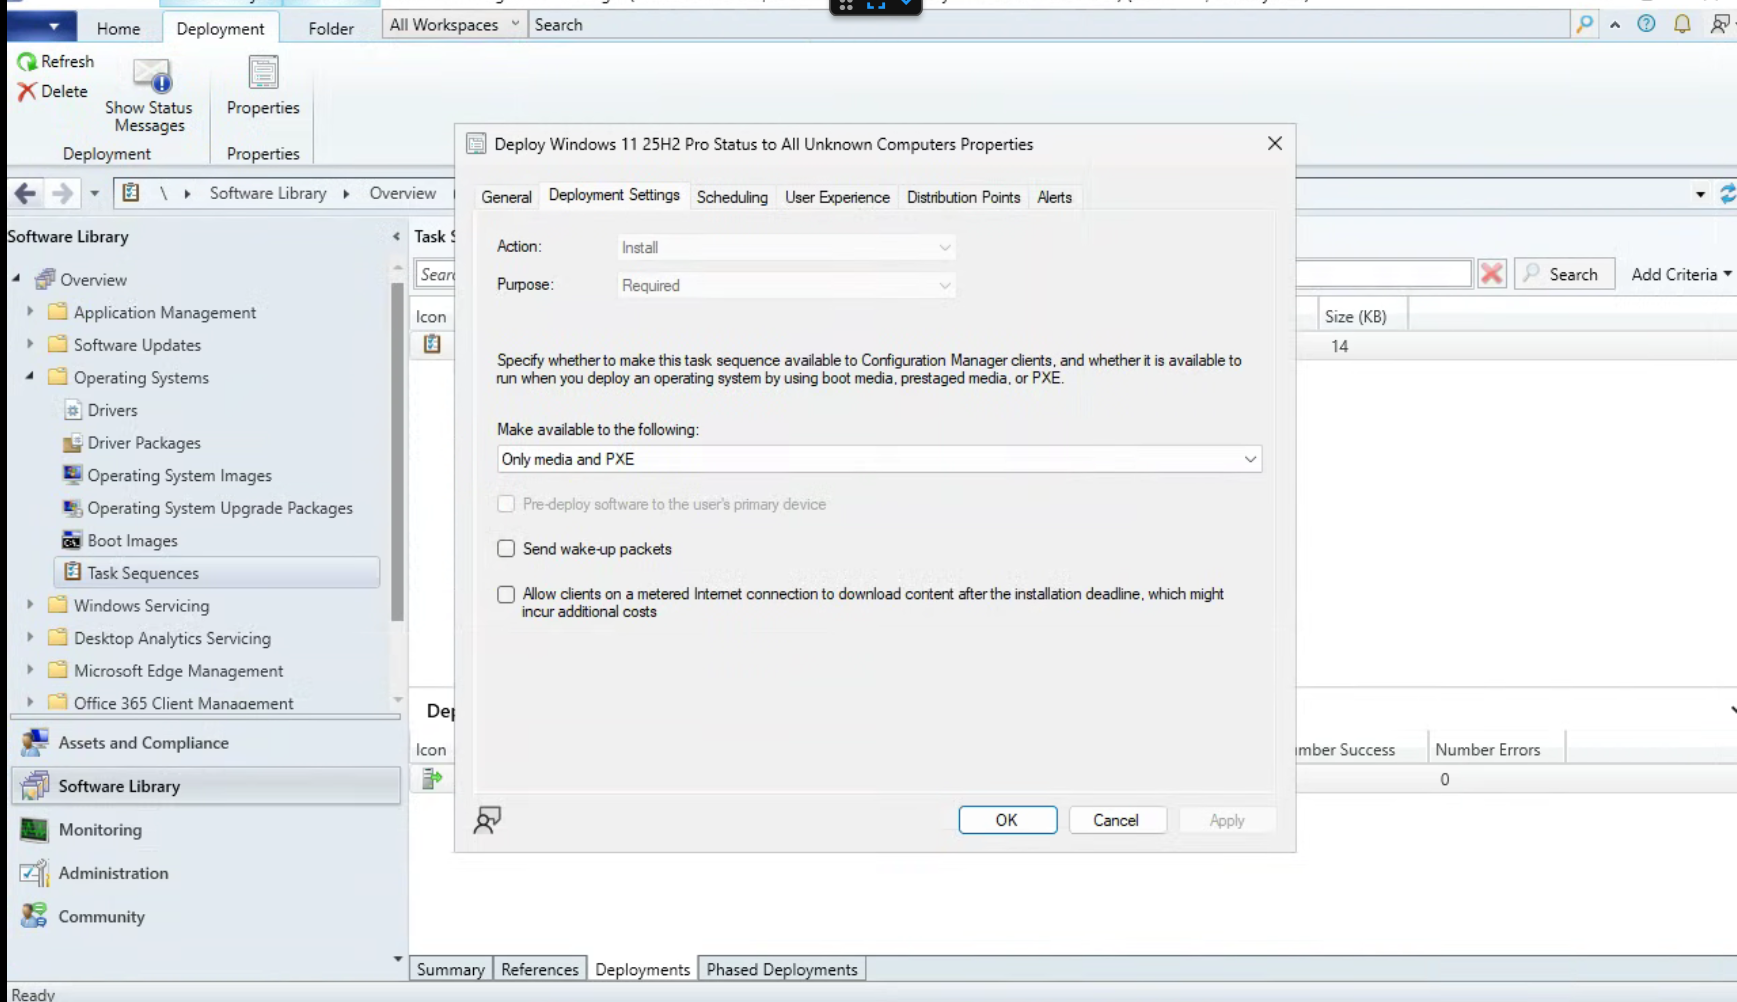
Required + All Unknown Computers means any unknown machine that boots from the network gets erased without asking. When you finish testing, remove the deployment: Software Library → Overview → Operating Systems → Task Sequences → click your task sequence → tab Deployments at the bottom → right-click the deployment → Delete.
Building the same machine again
After a successful build the machine is no longer unknown: the site has a record of it, usually named MININT-…, and network-booting it again offers nothing. To rebuild it:
- Assets and Compliance → Overview → Devices → find the machine (compare its MAC Address in the Summary pane at the bottom) → right-click → Delete. Never delete x64 Unknown Computer or x86 Unknown Computer; those are built-in placeholders.
- On the site server: services.msc → ConfigMgr PXE Responder Service → right-click → Restart, to clear its cache.
- Wait two minutes, then network-boot the machine again.
Available or Required changes how it boots
This cost me an hour. SMSPXE.log on the site server shows which boot file was sent:
| Purpose | Boot file sent | Behaviour |
|---|---|---|
| Available | pxeboot.com |
prints Press F12 for network service boot and waits |
| Required | pxeboot.n12 |
boots straight in, no key press |
With Available you have about three seconds to press F12. Miss it, and the machine tries its next boot device, finds nothing, and stops. That looks like a PXE failure but is not: the log shows the boot file was sent successfully and then nothing more.
The screen that says please provide these details to your Windows Deployment Services Administrator so that this request can be approved is normal, not a request for approval. It is old WDS text that appears on every PXE boot.
For a virtual machine, avoid VirtIO on the first attempt
Windows PE has no VirtIO drivers. That causes two failures that look like something else:
- VirtIO disk -- network boot works, Windows PE loads, then Partition Disk 0 fails because no disk is visible at all
- VirtIO network -- network boot works, because that is firmware and not Windows. Then Windows PE loads with no network, and the sequence stops at once
For the first build, in Proxmox: the VM → Hardware → Hard Disk on SATA, Network Device model Intel E1000. Both work without extra drivers. Adding VirtIO drivers to the boot image is a good exercise later and makes the build clearly faster, but not while you are still testing the task sequence itself.
For real hardware
In the firmware, enable UEFI network boot and turn off Secure Boot for the first try. On Dell machines the setting that is easy to miss is Enable UEFI Network Stack; without it there is no network boot entry in UEFI mode at all.
Real hardware may need real drivers. If the sequence fails right after Windows PE loads, the storage or network driver is not in the boot image. On a Dell, changing SATA Operation from RAID On to AHCI often fixes storage immediately, because Windows PE has AHCI drivers but not Intel RST drivers.
Watching it run
Two logs answer different questions.
On the server, SMSPXE.log records every network boot request and what it decided. If a machine gets no response, it tells you whether the request even arrived.
On the client, smsts.log shows what the task sequence just tried and what happened. It is the most important file in OS deployment, and it moves during the build: first X:\windows\temp\smstslog\ in Windows PE, then C:\_SMSTaskSequence\Logs\, then C:\Windows\CCM\Logs\.
To read it during the build, press F8 in Windows PE to open a command prompt. F8 only works if command support is on in the boot image: Software Library → Overview → Operating Systems → Boot Images → right-click the boot image → Properties → tab Customization → tick "Enable command support (testing only)", then let it update the distribution points. It gives anyone at the machine a full command prompt during a build, so turn it on while you troubleshoot and off again afterwards. F8 works only in Windows PE, before the first reboot.
The thread running through all of it
Four failures that looked different but had one cause.
| What failed | The identity that really needed the rights |
|---|---|
| Client push to a workstation | CM01$, the site server computer account. It needs local admin on the target |
| Content distribution | NT AUTHORITY\SYSTEM. A UNC path back to the same server arrives as local SYSTEM, not as the computer account |
| Update content download | My own account, with its admin group memberships removed by UAC |
| Reading a share from the console | The same. This is why an elevated console works differently |
The third needs its own note, because it is the hardest to understand. Downloading update content failed with access denied, and no PatchDownloader.log was written at all, so it failed before the download started: on the folder path.
The share was granted to Domain Admins, and an elevated PowerShell could write to it. But the Configuration Manager console runs non-elevated by default, and a non-elevated process has its admin group memberships removed from its token. Because the share was on the same machine, the file server checked that reduced token.
The fix is to give the rights to your user account directly, because a user account is never filtered out. In an elevated PowerShell on the site server:
Grant-SmbShareAccess -Name 'Sources$' -AccountName 'YourDomain\admin' -AccessRight Change -ForceSo the final permissions on the content share are (check them under File Explorer → right-click E:\Sources → Properties → Sharing → Advanced Sharing → Permissions):
| Who | Rights | Why |
|---|---|---|
| Domain Users | Read | clients reading content |
| Domain Computers | Read | machines using their computer account |
| NT AUTHORITY\SYSTEM | Read | the distribution manager over loopback |
| Domain Admins | Change | administrators placing content |
| Your own account | Change | survives UAC filtering for the console |
The rule: find out which identity does the work, and test as that identity. Not as yourself.
The logs, and what each one answers
Configuration Manager writes a lot of logs and summarises none of them. This short list covers most of what goes wrong. Open them with CMTrace (C:\Program Files\Microsoft Configuration Manager\tools\cmtrace.exe on the site server), which highlights errors in red.
On the site server, in the install folder. Look the path up instead of guessing it:
$CMLogs = Join-Path (Get-ItemProperty 'HKLM:\SOFTWARE\Microsoft\SMS\Identification')."Installation Directory" 'Logs'| Log | Question it answers |
|---|---|
distmgr.log |
did content reach the distribution point, and as which identity |
WCM.log |
is the site configuring WSUS correctly |
wsyncmgr.log |
did the catalogue sync, and what was requested |
ruleengine.log |
what did the automatic deployment rule match, and what did it do |
SMSPXE.log |
which machines asked to network boot, and what was sent |
CMUpdate.log |
site version upgrades |
On a client, in C:\Windows\CCM\Logs:
| Log | Question it answers |
|---|---|
PolicyAgent.log |
did the deployment policy arrive at all |
AppIntentEval.log |
how did the client reconcile competing deployments, and will it act |
AppDiscovery.log |
did detection run, and what did it conclude |
AppEnforce.log |
the literal command line executed, and its exit code |
WUAHandler.log |
did the update scan reach the server, was policy overridden |
UpdatesDeployment.log |
assignment evaluation -- exists only once something is deployed |
UpdatesHandler.log |
update content download and installation |
smsts.log |
everything about a running task sequence |
A client health check that covers most of it in one paste, in PowerShell on the client:
Get-ItemProperty 'HKLM:\SOFTWARE\Policies\Microsoft\Windows\WindowsUpdate' |
  Select-Object WUServer, DoNotConnectToWindowsUpdateInternetLocations, DisableDualScan

@(Get-WmiObject -Namespace root\ccm\Policy\Machine\ActualConfig -Class CCM_UpdateCMAssignment).Count

Get-WmiObject -Namespace root\ccm\SoftwareUpdates\UpdatesStore -Class CCM_UpdateStatus |
  Group-Object Status | Select-Object Name, Count
That assignment count is the fastest check in the whole system. Zero means no deployment ever reached this machine: the problem is targeting or policy, not installation, and half the possible causes are already ruled out.
To start the client cycles now instead of waiting, in an elevated PowerShell on the client (or on the client: Control Panel → Configuration Manager → tab Actions → select a cycle → Run Now):
([wmiclass]'root\ccm:SMS_Client').TriggerSchedule('{00000000-0000-0000-0000-000000000021}')  # Machine policy
([wmiclass]'root\ccm:SMS_Client').TriggerSchedule('{00000000-0000-0000-0000-000000000113}')  # Software update scan
([wmiclass]'root\ccm:SMS_Client').TriggerSchedule('{00000000-0000-0000-0000-000000000108}')  # Update deployment evaluation
([wmiclass]'root\ccm:SMS_Client').TriggerSchedule('{00000000-0000-0000-0000-000000000121}')  # Application deployment evaluation
Two habits that will mislead you
Format-Table -AutoSize hides columns that do not fit, without any warning. Update titles are long. You ask for four columns, see one, and think the data is missing. Use Format-List.
The Get-CM* cmdlets need the site drive, and otherwise fail with This command cannot be run from the current drive:
Import-Module "$($env:SMS_ADMIN_UI_PATH)\..\ConfigurationManager.psd1"
Set-Location P01:
Or in the console: the blue arrow at the top left (left of the Home tab) → Connect via Windows PowerShell. It opens a session that is already connected.
What I would do differently
Fix the DNS from DHCP on day one, not the evening before network deployment. It was on my list for weeks as "later", and it was the one thing I could not work around by hand.
Limit discovery before you turn it on, not after. Turn on discovery for a live domain first and limit it later, and real machines are in the database before anyone notices.
Check the client before you believe the console. The two findings that cost me most, the client that updated itself and the zero in the Required column, would each have taken half an hour instead of several evenings if I had first asked the machine. The console shows reports; the client has the facts.
Break things on purpose, early. A detection rule I broke on purpose taught me more in twenty minutes than an hour of reading. A failure you caused yourself is one you understand.
What it looks like when it works
An empty laptop, connected to the network and switched on. From here on, nobody touches it. You can follow every stage on the machine's own screen; for a VM, in Proxmox: the VM → Console.
1. Network boot. The machine asks the network for a boot server, the distribution point answers, and Windows PE is loaded over the network.
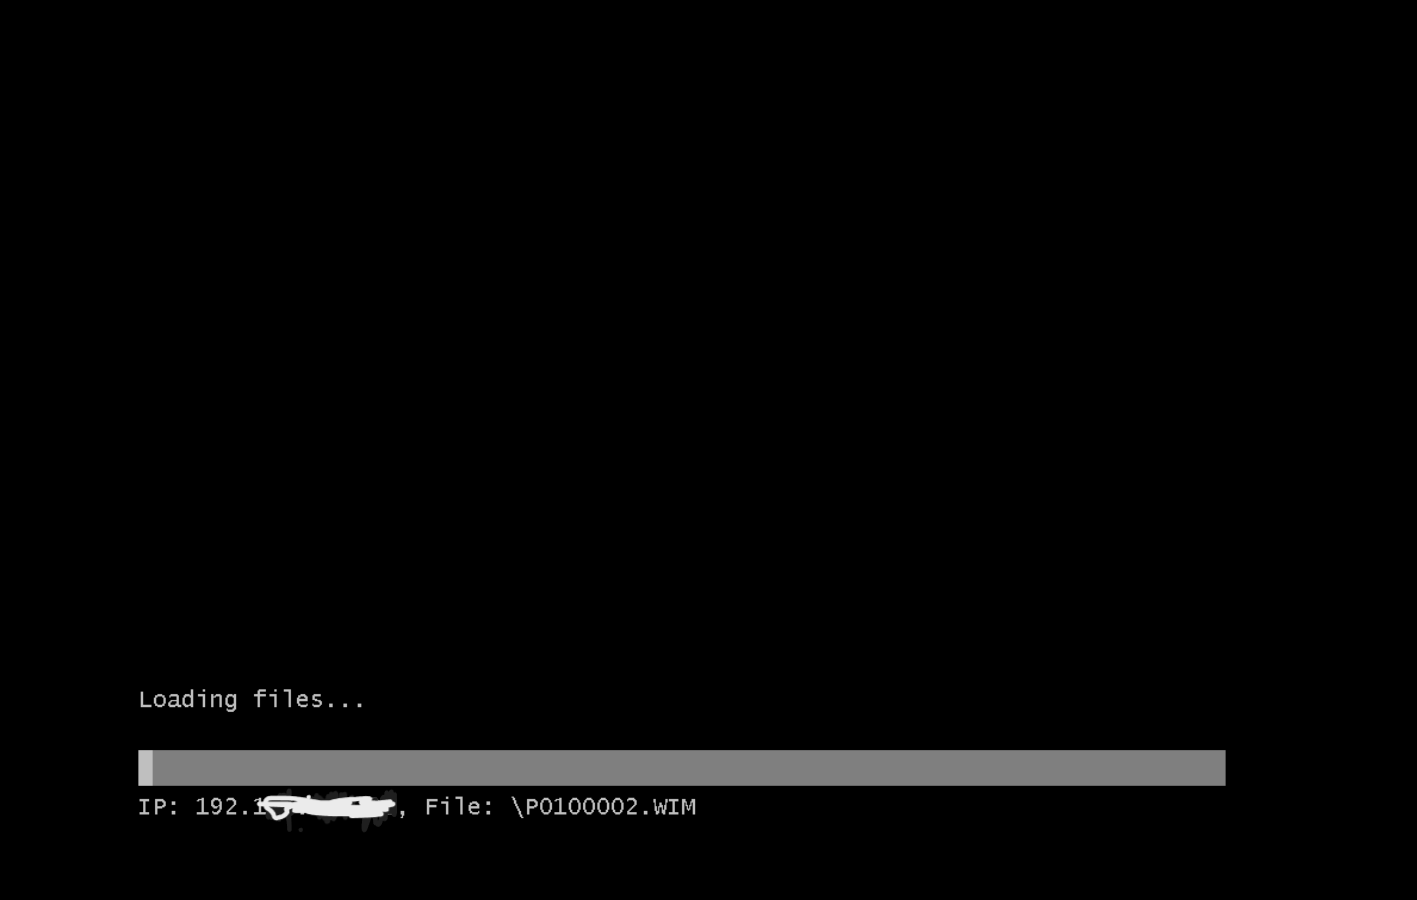
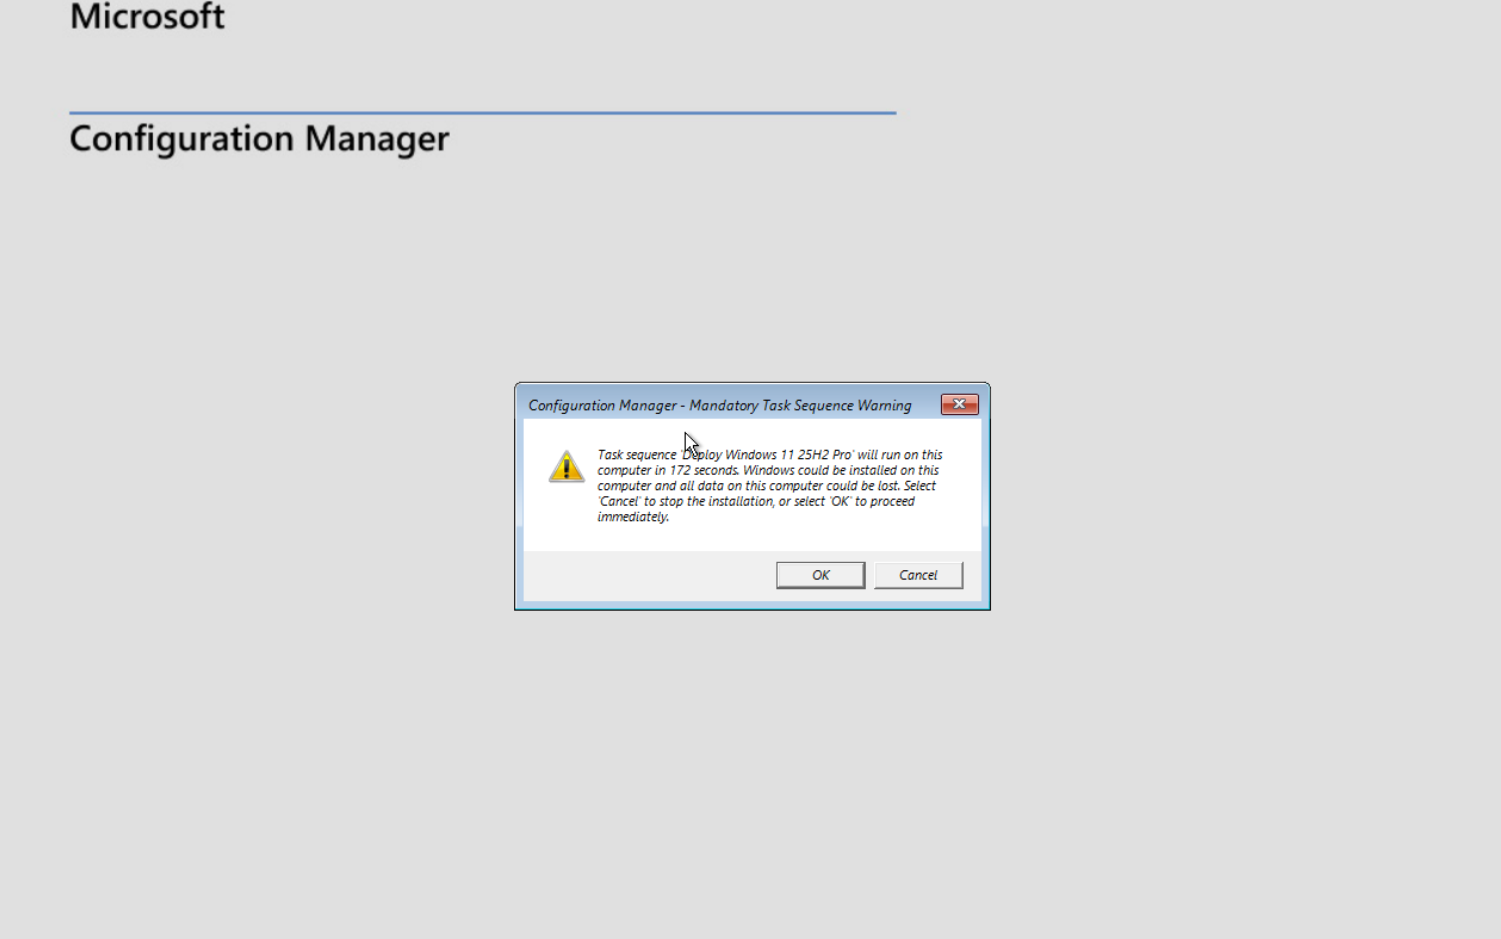
2. The last chance to cancel. Because the deployment is Required, a countdown warns that the disk will be erased. Wait, or click OK to start immediately; Cancel stops everything and nothing is changed.
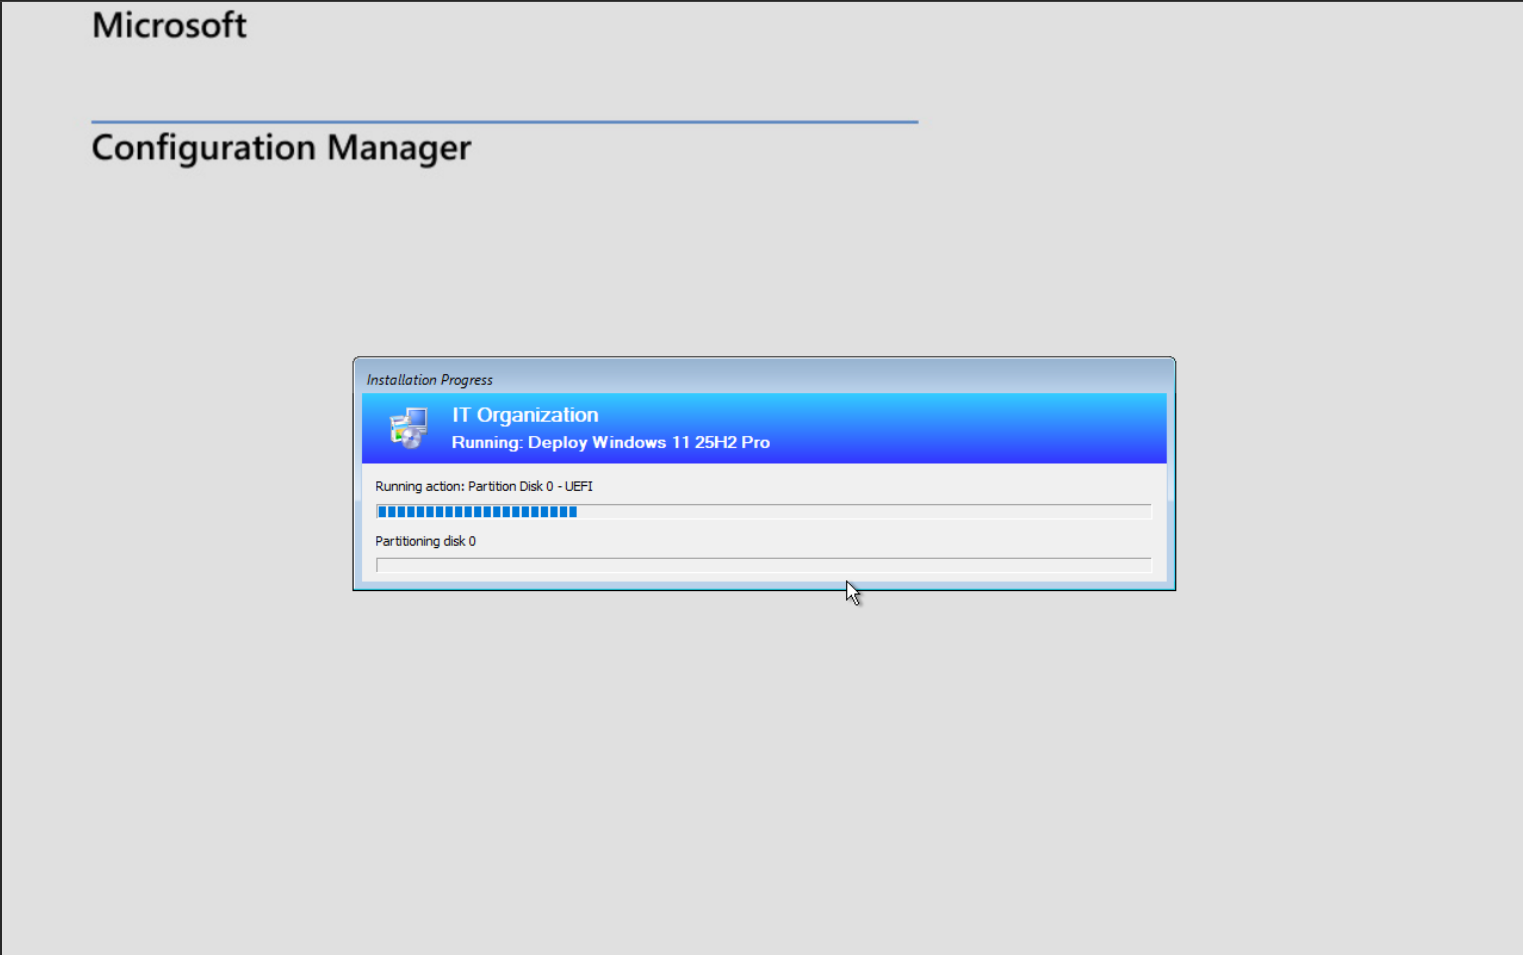
3. The disk is wiped and partitioned. From this point the old data is gone.
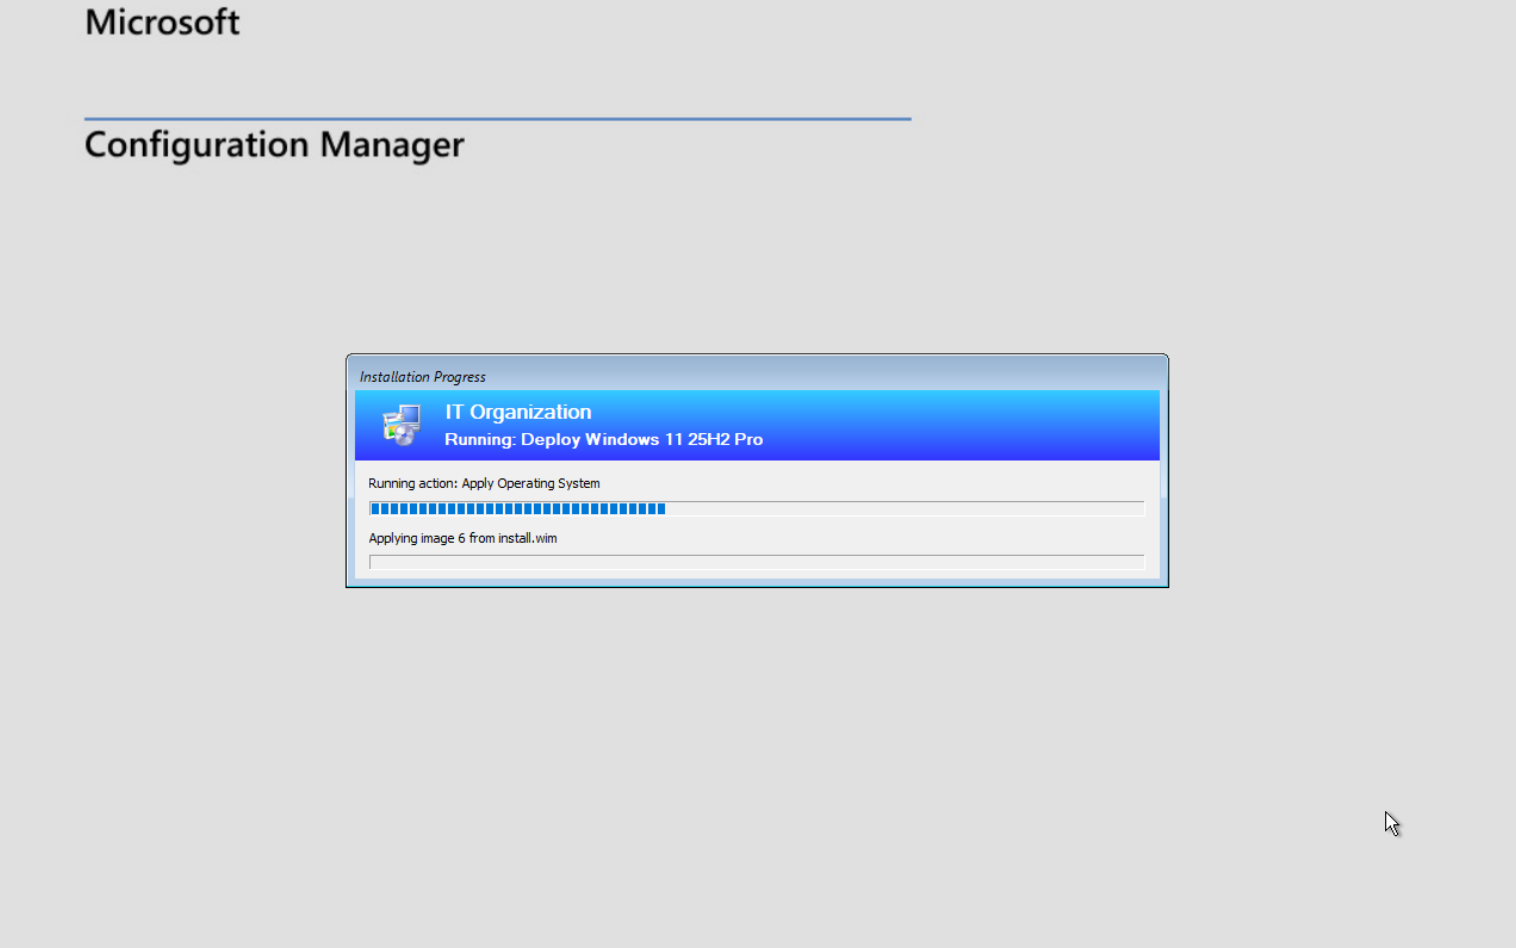
4. Windows is applied. The longest step: the image is copied from the distribution point and written to the disk. Then drivers, a few reboots, the domain join and the Configuration Manager client follow, all on their own.
5. Done. After about twenty minutes: a login screen. The machine has its name, is joined to the domain, has the management client installed and reporting, and appears in the console, ready for software and patches.
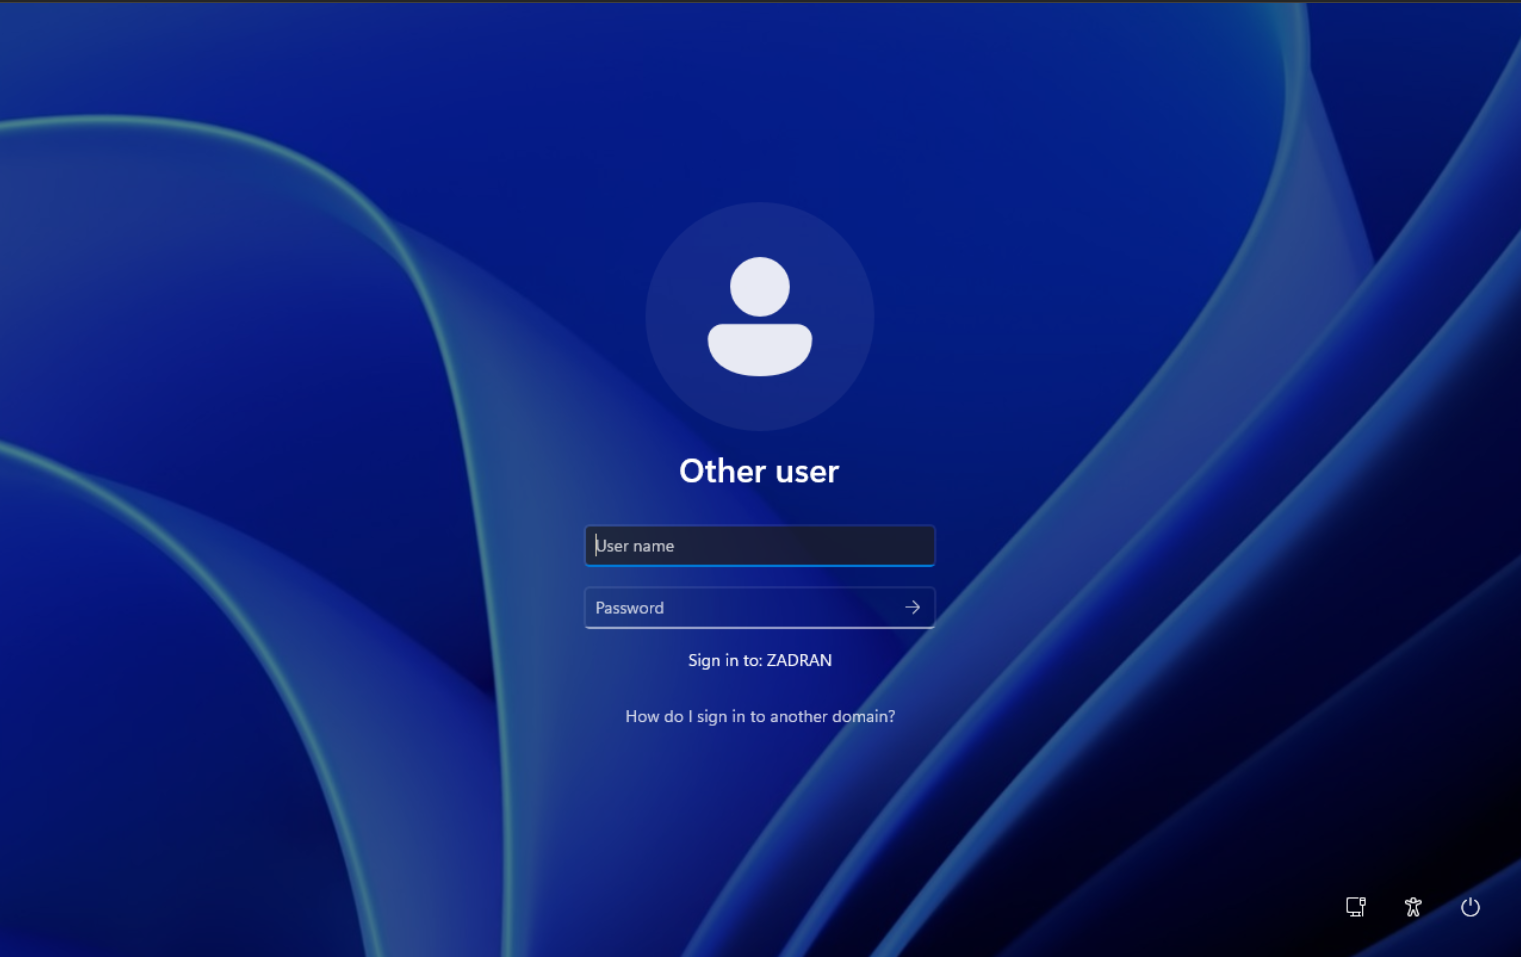
Nobody touched it after pressing the power button.
Did this guide work for you?
Thank you! That helps me keep this guide right.