Patching and Deploying Windows Over the Network with Configuration Manager
Patch Windows from your own server, then reinstall a laptop over the network without touching it.
Before you start
- A working Configuration Manager primary site with at least one client that reports in, as built in part one.
- A Windows 11 ISO.
- A spare machine or virtual machine that you can erase.
- Control of the DHCP server for the network those machines are in.
Your values
Fill these in and every command below updates to match. Nothing is sent anywhere.
Run this at your own risk. These steps worked on my hardware; yours may differ. Take a backup first, read each command before running it, and see the disclaimer.
This continues from part one: building the site, installing clients and deploying software. Now the lab does the two things that make endpoint management worth it: patching machines from your own server, and rebuilding a machine completely over the network without anyone touching it.
Both parts taught the same lesson: the console said one thing, the machine said another, and the machine was right.
Install WSUS, then never open it again
Configuration Manager uses WSUS in the background as a catalogue of updates, and controls it completely. Install it on the site server with SQL instead of the Windows Internal Database, so you only have one database engine to look after. In an elevated PowerShell on the site server:
Install-WindowsFeature UpdateServices-Services,UpdateServices-DB -IncludeManagementTools
cd "C:\Program Files\Update Services\Tools"
.\wsusutil.exe postinstall SQL_INSTANCE_NAME="CM01" CONTENT_DIR=E:\WSUS
For a default SQL instance, the instance name is just the server name, with no backslash.
If the post-install fails at the very last step with a System.Security.SecurityException, do not uninstall anything. The database, folders and service were created. Reboot and run the same command again; wsusutil postinstall is safe to repeat and usually works the second time.
Then make two changes, in the same PowerShell. They prevent problems that are very hard to find later:
Import-Module WebAdministration
Set-ItemProperty 'IIS:\AppPools\WsusPool' -Name recycling.periodicRestart.privateMemory -Value 0
Set-ItemProperty 'IIS:\AppPools\WsusPool' -Name queueLength -Value 2000
Restart-WebAppPool -Name WsusPool

New-NetFirewallRule -DisplayName "WSUS HTTP 8530"  -Direction Inbound -Protocol TCP -LocalPort 8530 -Action Allow
New-NetFirewallRule -DisplayName "WSUS HTTPS 8531" -Direction Inbound -Protocol TCP -LocalPort 8531 -Action Allow
The WSUS application pool comes with a memory limit of about 1.8 GB, and WSUS often goes over it. IIS then restarts the pool in the middle of a scan, and clients fail with timeouts that look exactly like network problems. Zero means no limit, which is what Microsoft recommends.
WSUS uses ports 8530 and 8531, not 80 and 443.
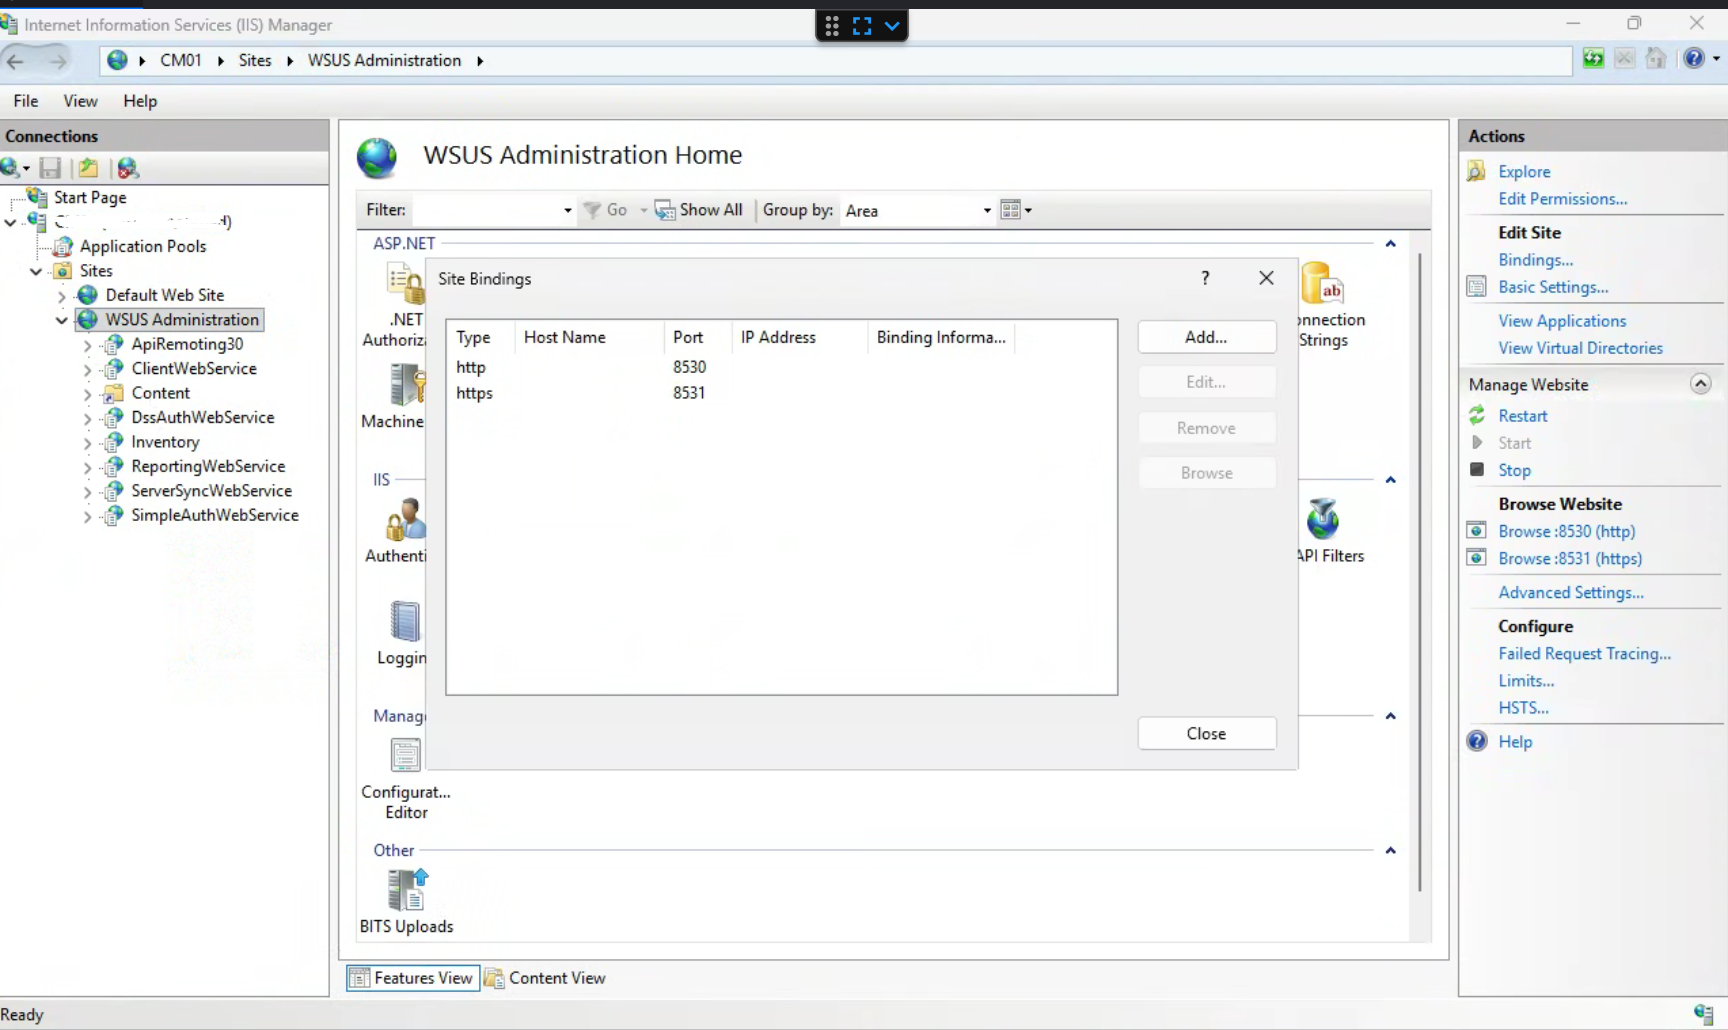
Add the Software Update Point and choose products
- Add the role: Configuration Manager console → Administration (workspace, bottom left) → Overview → Site Configuration → Servers and Site System Roles → right-click your site server → Add Site System Roles → tick Software Update Point → finish the wizard.
- Sync once to get the product list: Software Library → Overview → Software Updates → All Software Updates → ribbon Synchronize Software Updates.
- Choose products and classifications: Administration → Overview → Site Configuration → Sites → click your site → ribbon Configure Site Components → Software Update Point → tab Products (here: Windows 11, Microsoft Defender Antivirus) and tab Classifications (here: Security Updates, Definition Updates).
- Sync again (step 2), so the updates for those products arrive.
From now on, do not open the WSUS console. Configuration Manager controls those settings and overwrites anything you change there.
Two things about the product list in step 3. It loads only when the window opens, so after a sync, close it completely and open it again to see new products. And its search box does not work well: a product can look unavailable while it is already ticked. Check the sync log instead, wsyncmgr.log on the site server (see The logs at the end for the folder). It shows exactly what was requested:
Requested categories: Product=Windows 11, Product=Microsoft Defender Antivirus,
UpdateClassification=Security Updates, UpdateClassification=Definition Updates
When the console and the log disagree, believe the log.
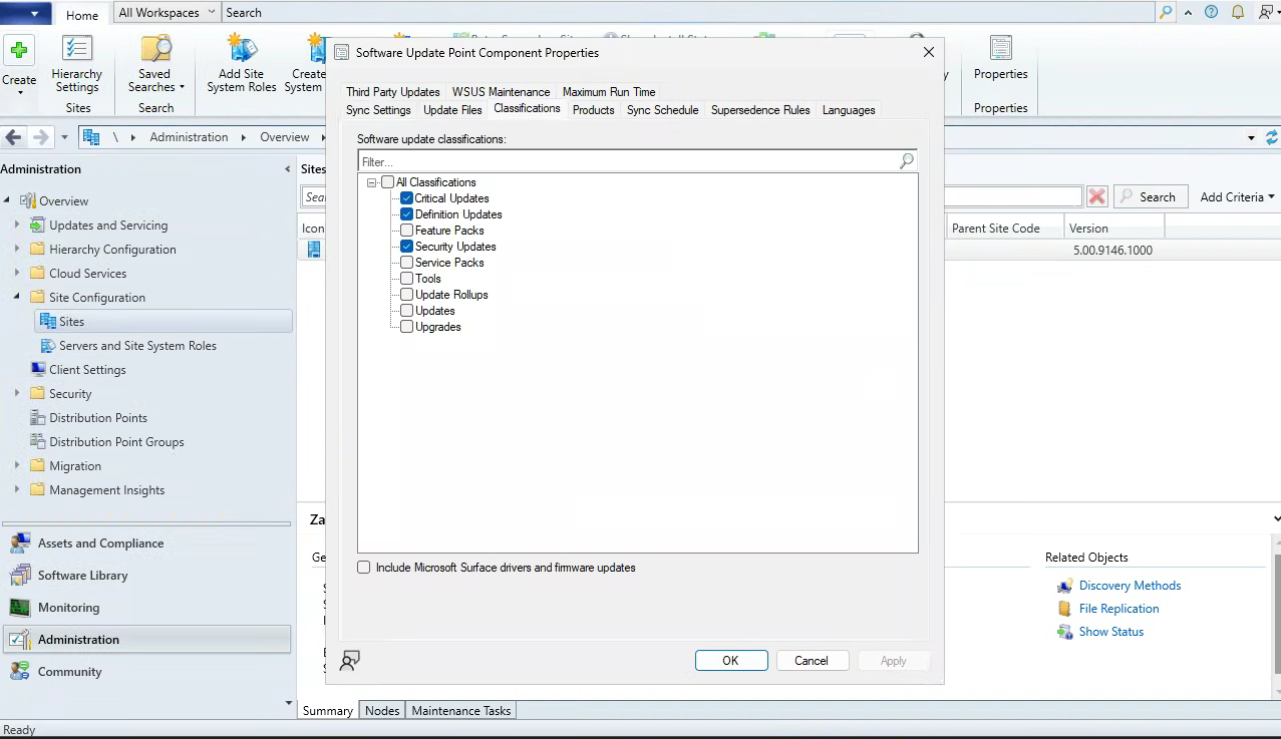
Finding one: a client with internet access never needs anything
Everything looked healthy, but the console showed zero updates required by any machine. It looks broken, but it is not.
Setting the update server address does not stop Windows from going directly to Microsoft for drivers and Defender definitions, and unless you turn it off, for quality updates too. The lab clients had been updating themselves since the day they were built, so Configuration Manager really had nothing to install.
You can see this yourself. On a client, in an elevated PowerShell, delete the Defender definitions:
& "$env:ProgramFiles\Windows Defender\MpCmdRun.exe" -RemoveDefinitions -All
Get-MpComputerStatus | Select-Object AntivirusSignatureVersion
It shows 0.0.0.0. Wait five minutes, and the definitions are back, from Microsoft, without asking. In a company this means machines update without your server, and your reports show healthy machines that you did not update.
The fix belongs in Group Policy
Not in a registry change on one machine: that is lost when the machine is rebuilt and does not apply to the next one.
On a domain controller: Server Manager → Tools → Group Policy Management → right-click the OU that holds your clients → Create a GPO in this domain, and Link it here → give it a name → right-click it → Edit. In the editor:
Computer Configuration → Policies → Administrative Templates → Windows Components → Windows Update. The two settings are in different sub-folders:
| Sub-folder | Setting | Value |
|---|---|---|
| Manage updates offered from Windows Server Update Service | Do not connect to any Windows Update Internet locations | Enabled |
| Legacy Policies | Do not allow update deferral policies to cause scans against Windows Update | Enabled |
The second one closes a gap called dual scan, where Windows checks Microsoft anyway. In current Windows 11 and Windows Server ADMX files, it is under Legacy Policies, not with the other WSUS settings. If you only look in the WSUS folder, it seems to no longer exist.
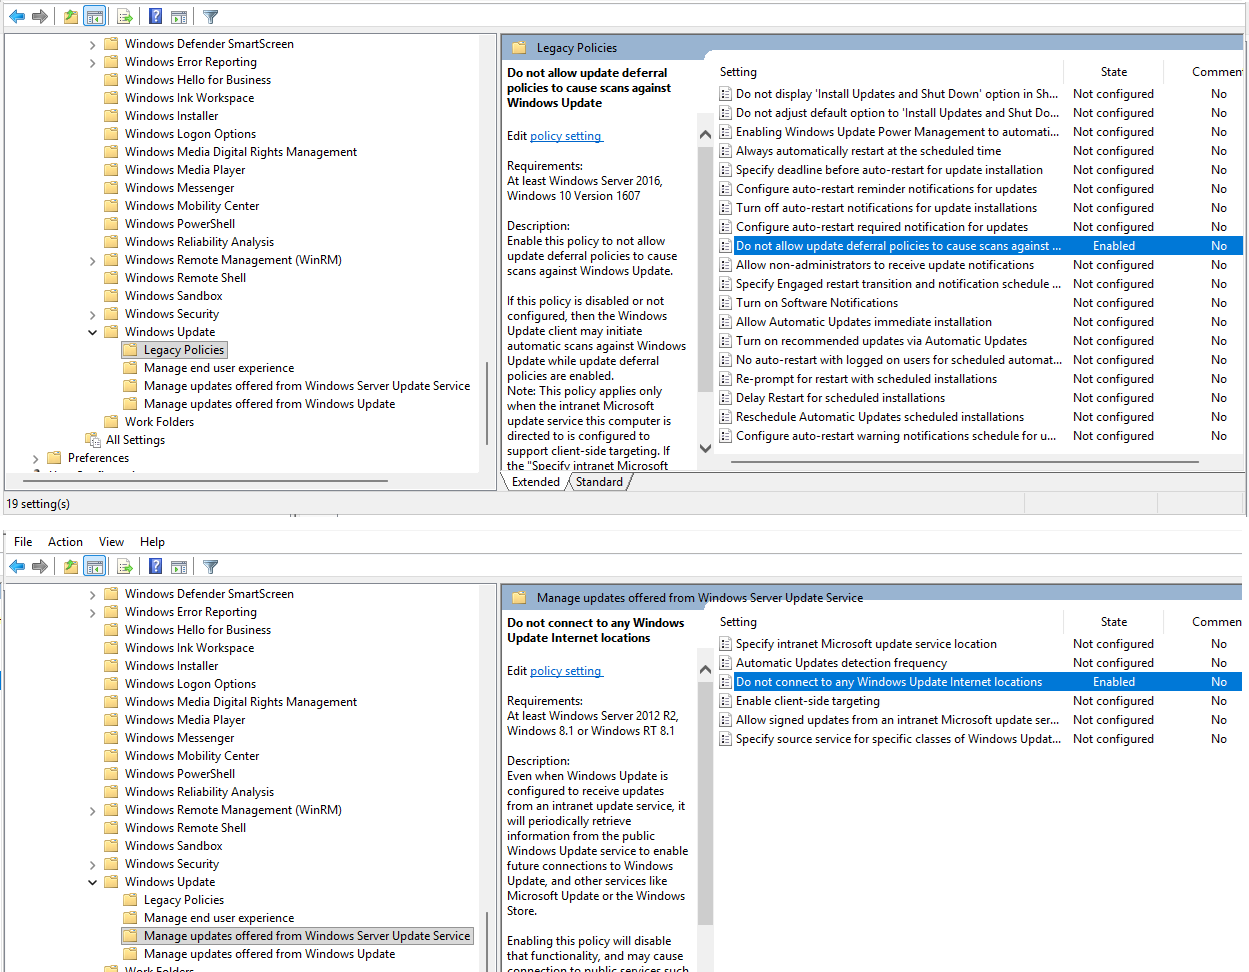
Do not set Specify intranet Microsoft update service location here. Configuration Manager writes that value itself, and a policy with the same value works against it. An old Group Policy pointing to an update server that no longer exists is a classic, almost invisible update failure, so check for one first, in PowerShell on a domain controller:
Get-GPO -All | ForEach-Object {
  $r = Get-GPOReport -Guid $_.Id -ReportType Xml
  if ($r -match 'WUServer|WindowsUpdate') { $_.DisplayName }
}
For Defender, in the same GPO: Computer Configuration → Policies → Administrative Templates → Windows Components → Microsoft Defender Antivirus → Security Intelligence Updates:
| Setting | Value |
|---|---|
| Define the order of sources for downloading security intelligence updates | Enabled, value InternalDefinitionUpdateServer |
| Define file shares for downloading security intelligence updates | Not Configured |
| Allow security intelligence updates from Microsoft Update | Disabled |
Leave the file-shares setting Not Configured. Enabling it with an empty box is not allowed, and "not configured" already means "no file shares".
On a client, run gpupdate /force, then check both parts:
Get-ItemProperty 'HKLM:\SOFTWARE\Policies\Microsoft\Windows\WindowsUpdate' |
  Select-Object WUServer, DoNotConnectToWindowsUpdateInternetLocations, DisableDualScan

Get-MpPreference | Select-Object SignatureFallbackOrder
The registry value is what the policy wrote; Get-MpPreference is what the Defender service accepted. If they differ, the policy arrived but is not active.
Now, if you delete the definitions again, they stay at 0.0.0.0. Your server is the only source.
Finding two: "Required: 0" does not mean "not needed"
The console showed Required: 0 for an update the client was missing.
Where to look: Software Library → Overview → Software Updates → All Software Updates → click an update → the Summary pane at the bottom, Statistics section. The clue is Last Update: Never. That column is a summary report, made by a background task every hour. Until that task has processed an update, the column shows zero and every machine shows as Unknown.
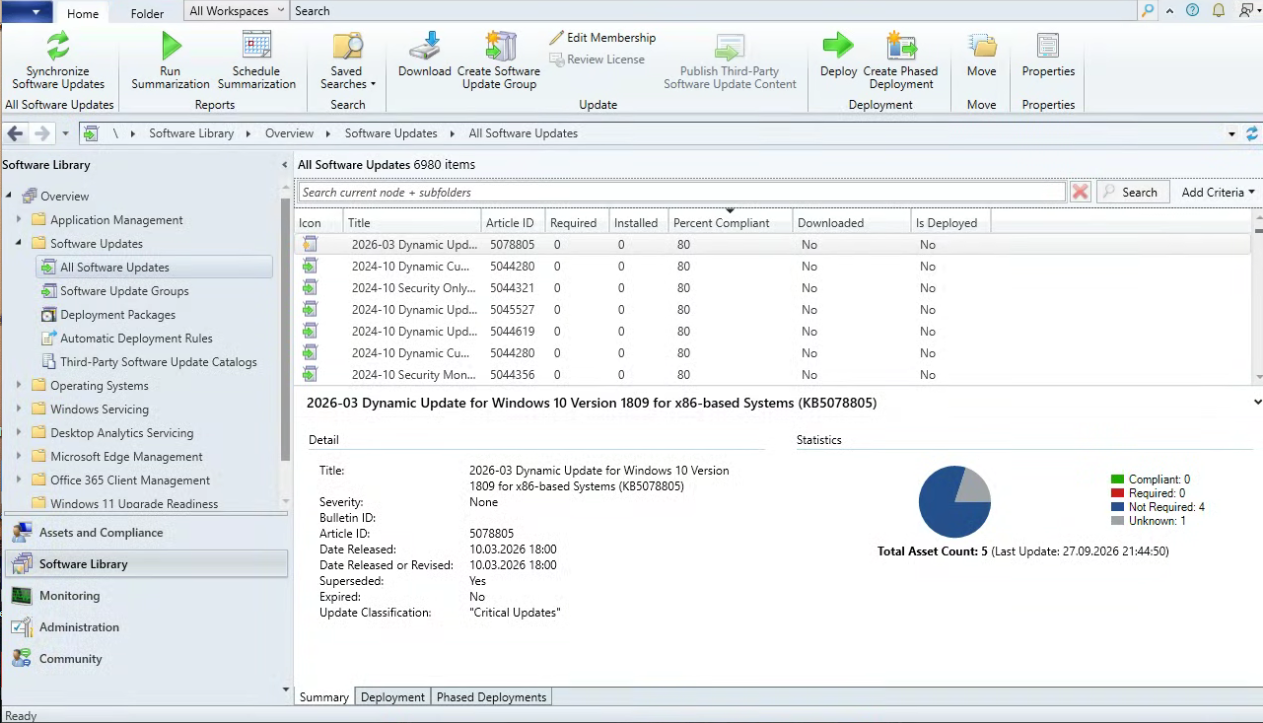
The true answer is on the client, in Configuration Manager's own scan results (PowerShell on the client):
Get-WmiObject -Namespace root\ccm\SoftwareUpdates\UpdatesStore -Class CCM_UpdateStatus |
  Where-Object { $_.Status -eq 'Missing' } |
  Select-Object Article, Title, Status | Format-Table -AutoSize
While the console said zero, this showed sixteen missing updates.
When the console and the client disagree, the client is right. To refresh the report: All Software Updates → ribbon Run Summarization. You do not need to wait for it; you can deploy without it.
Automate it with a deployment rule
When one manual deployment has installed successfully, let an Automatic Deployment Rule do it on a schedule: it finds matching updates, groups them, downloads the content and deploys it.
Create it: Software Library → Overview → Software Updates → Automatic Deployment Rules → ribbon Create Automatic Deployment Rule. To change it later: right-click the rule → Properties.
Two settings decide whether it does anything useful. Both are in the rule's properties:
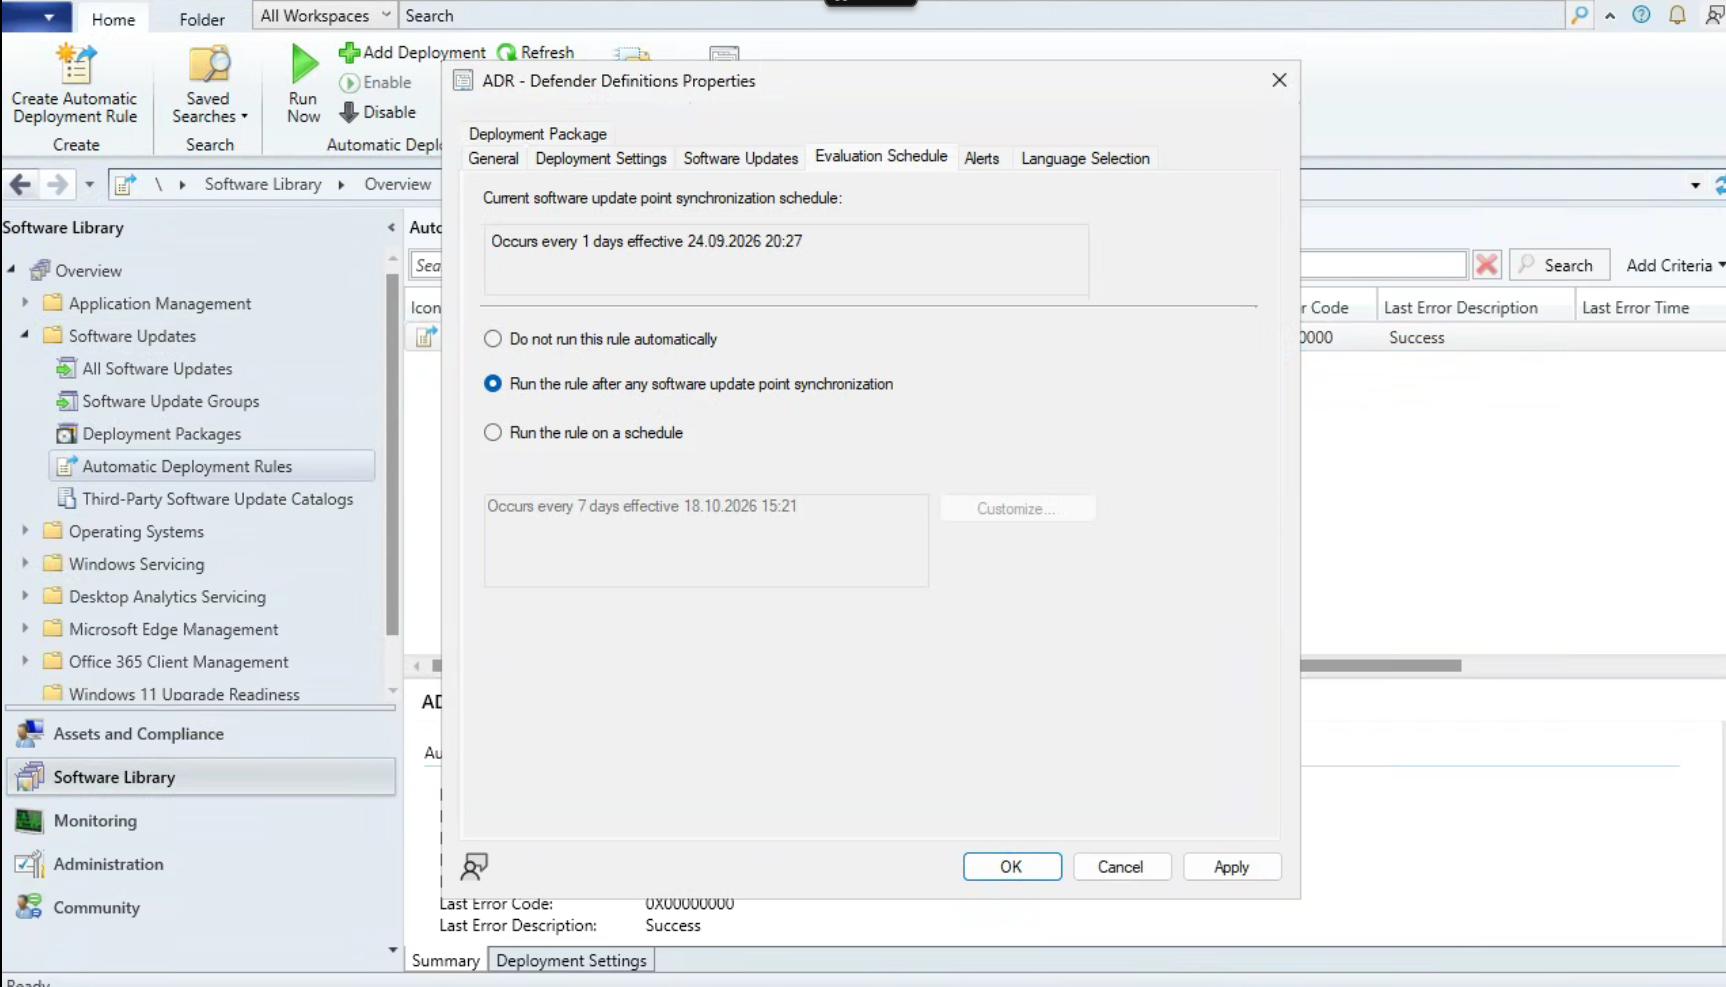
- Tab Evaluation Schedule: select "Run the rule after any software update point synchronization". The sync brings in new updates, and the rule runs right after it.
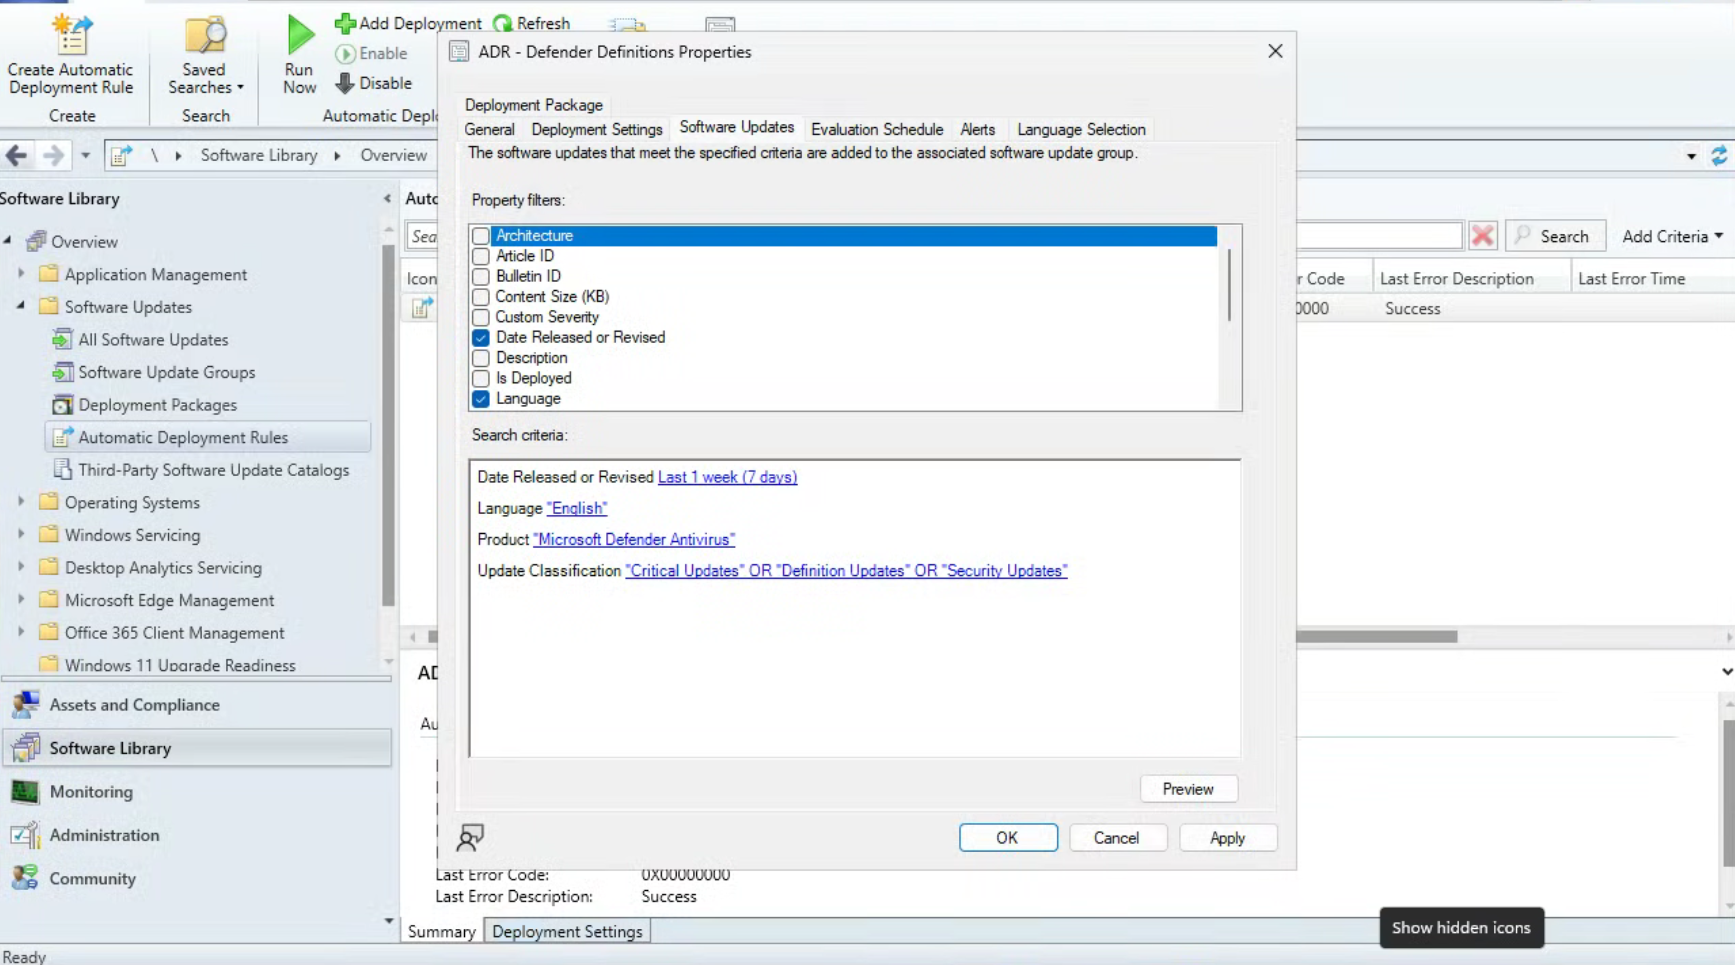
- Tab Software Updates: check the "Date Released or Revised" filter. It must fit how often your sync runs. Mine found nothing on its first run: the filter said "Last 1 day", but the sync ran only once a week, so the catalogue was almost always older than a day. A daily filter needs a daily sync; with a weekly sync, use "Last 1 week" or longer. The sync schedule is set in Administration → Site Configuration → Sites → your site → ribbon Configure Site Components → Software Update Point → tab Sync Schedule.
The rule writes its own log, ruleengine.log on the site server. It is the only place that shows what was matched:
The rule resulted in no updates being found. Skip deployment creation or update...
CRuleHandler: Rule 1 Successfully Applied!
"Successfully Applied" together with "no updates found" is not an error. The rule ran, but nothing matched its filters.
Deploying Windows over the network
Three things to fix before you start
Each of these fails late, with an unclear message, when nobody is logged on to fix it.
1. DHCP must give out a domain controller as DNS server. A machine built over the network gets its DNS from DHCP. If that DNS server cannot answer Active Directory queries, the build fails at the domain join. In your DHCP server (for example pfSense: Services → DHCP Server → LAN → DNS Servers), set your domain controller and nothing else. Windows does not use a second DNS server as a backup the way people expect; a second entry that cannot answer AD queries causes random failures. Let the domain controller forward everything else to your normal DNS server.
Check from an existing client:
Get-DnsClientServerAddress -AddressFamily IPv4 | Select-Object InterfaceAlias, ServerAddresses
nltest /dsgetdc:yourdomain.com
Resolve-DnsName google.com | Select-Object -First 1
You want your domain controller as the only server, nltest should find it, and public names should still resolve.
2. A separate account for joining the domain, svc_cm_djoin, with no group memberships. Create it in Active Directory Users and Computers, then give it rights only on the OU where new machines go: right-click the OU → Delegate Control → Next → Add svc_cm_djoin → Next → Create a custom task to delegate → Only the following objects in the folder → tick Computer objects, plus Create selected objects in this folder and Delete selected objects in this folder → Next → tick Full Control → Finish. The alternative, a Domain Admin password in the task sequence, can be read by anyone who can read the task sequence.
3. Distribute the boot images. Software Library → Overview → Operating Systems → Boot Images → right-click Boot Image (x64) → Distribute Content → add your distribution point. Check it under Monitoring → Overview → Distribution Status → Content Status: it must show Success. Until then it shows Targeted 0, and network boot cannot send what the distribution point does not have.
Turn on PXE
Administration → Overview → Distribution Points → right-click your distribution point → Properties → tab PXE:
| Setting | Value |
|---|---|
| Enable PXE support for clients | Ticked |
| Allow this distribution point to respond to incoming PXE requests | Ticked |
| Enable a PXE responder without Windows Deployment Service | Ticked |
| Enable unknown computer support | Ticked |
| PXE server response delay | 0 |
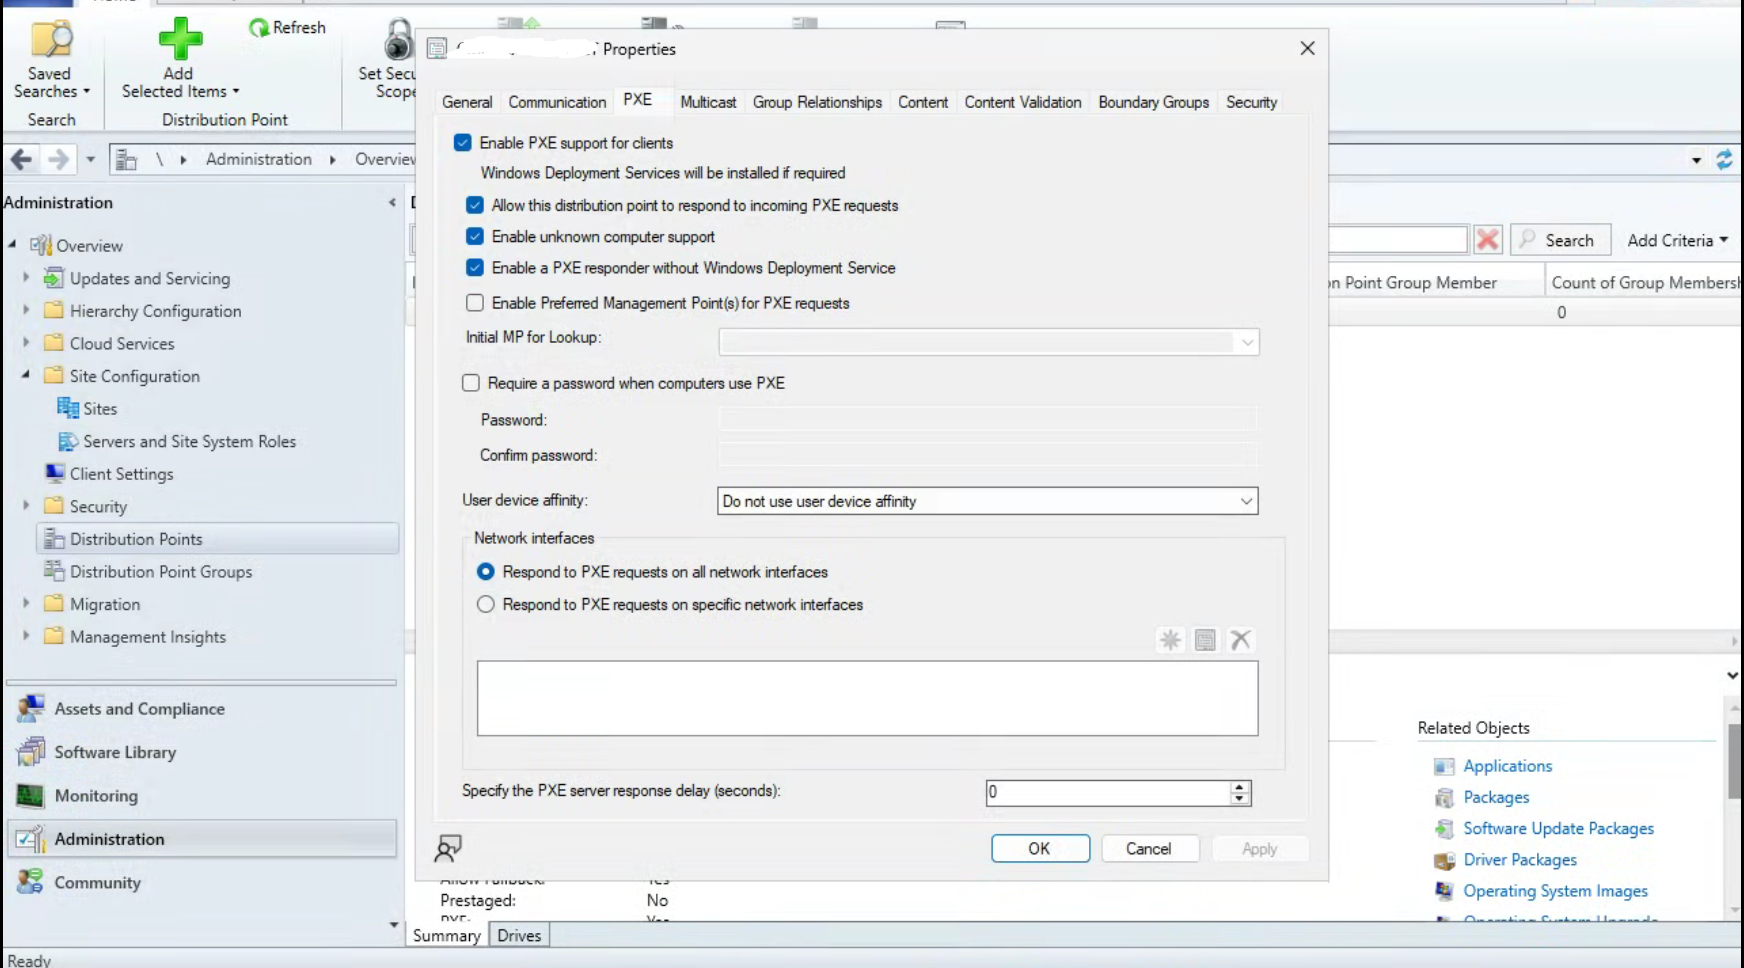
Enable unknown computer support lets you build a machine the site has never seen. Without it, a new empty laptop gets no answer at all.
You get a warning that Windows Deployment Services will be installed. Accept it. Because the responder box is ticked, Configuration Manager installs WDS, then stops and disables it, and uses the ports itself. You can see this in SMSPXE.log:
Start SCCM PXE as a service.
Waiting for WDS to stop ...
WDS has stopped.
Disabled WDS.
--- Starting DHCP on ... 192.168.1.22, 67.
--- Starting PXE on ... 192.168.1.22, 4011.
--- Starting TFTP on 192.168.1.22.
If your machines are in the same subnet as the distribution point, do not set DHCP options 66 and 67, and no IP helpers. PXE works by broadcast; those options only matter when PXE has to go through a router.
Import a Windows image
Copy install.wim from the Windows ISO to a permanent folder (not the mounted ISO, which disappears after a reboot). Then remove the read-only attribute: files copied from a mounted ISO keep it, and the import then fails with "Generic failure":
Set-ItemProperty "E:\Sources\OSD\Images\Win11\install.wim" -Name IsReadOnly -Value $falseA retail wim contains every edition. Extract the one you want yourself with DISM; the import wizard hides every error behind the same "Generic failure", DISM tells you what really went wrong:
Get-WindowsImage -ImagePath "E:\Sources\OSD\Images\Win11\install.wim" |
  Select-Object ImageIndex, ImageName | Format-Table -AutoSize

Dism /Export-Image /SourceImageFile:"E:\Sources\OSD\Images\Win11\install.wim" `
  /SourceIndex:6 /DestinationImageFile:"E:\Sources\OSD\Images\Win11-Pro\install.wim" `
  /Compress:max /CheckIntegrity
Then import the exported file: Software Library → Overview → Operating Systems → Operating System Images → ribbon Add Operating System Image, with the extract option unticked.
The path field in that wizard accepts only a UNC path (\\server\share\...); a local path like E:\... is rejected. If your share name ends with $, it is hidden and never appears when you browse, so type the full path into the file name box.
Build the task sequence
Software Library → Overview → Operating Systems → Task Sequences → ribbon Create Task Sequence → Install an existing image package. It creates the whole sequence (partition, apply image, drivers, domain join, client install); you can change any step later with right-click → Edit.
| Wizard page | Setting |
|---|---|
| Task Sequence Information | Boot image: the x64 one |
| Install Windows | Your image, partition and format ticked, and always use the same administrator password |
| Configure Network | Join a domain, your OU, and YOURDOMAIN\svc_cm_djoin |
| Install Configuration Manager | The client package, properties SMSMP=cm01.yourdomain.com |
| Include Updates / Install Applications | Nothing on the first run |
The fixed administrator password gives you a local account to log in with when a build fails halfway and there is no domain account yet. In production, make it random and disable the account.
Leave updates and applications out of the first build: a basic build takes twenty minutes, with updates an hour. Get it working first.
Deploy it, carefully
Task Sequences → right-click your task sequence → Deploy:
| Wizard page | Setting |
|---|---|
| General → Collection | All Unknown Computers |
| Deployment Settings → Purpose | Required |
| Deployment Settings → Make available to the following | Only media and PXE |
"Only media and PXE" is the most important setting on that page. This task sequence erases the disk. With that setting, it can only run from a network boot, so it never appears in Software Center on a working machine. With "Configuration Manager clients" instead, you have built a way to destroy a working PC with one click.
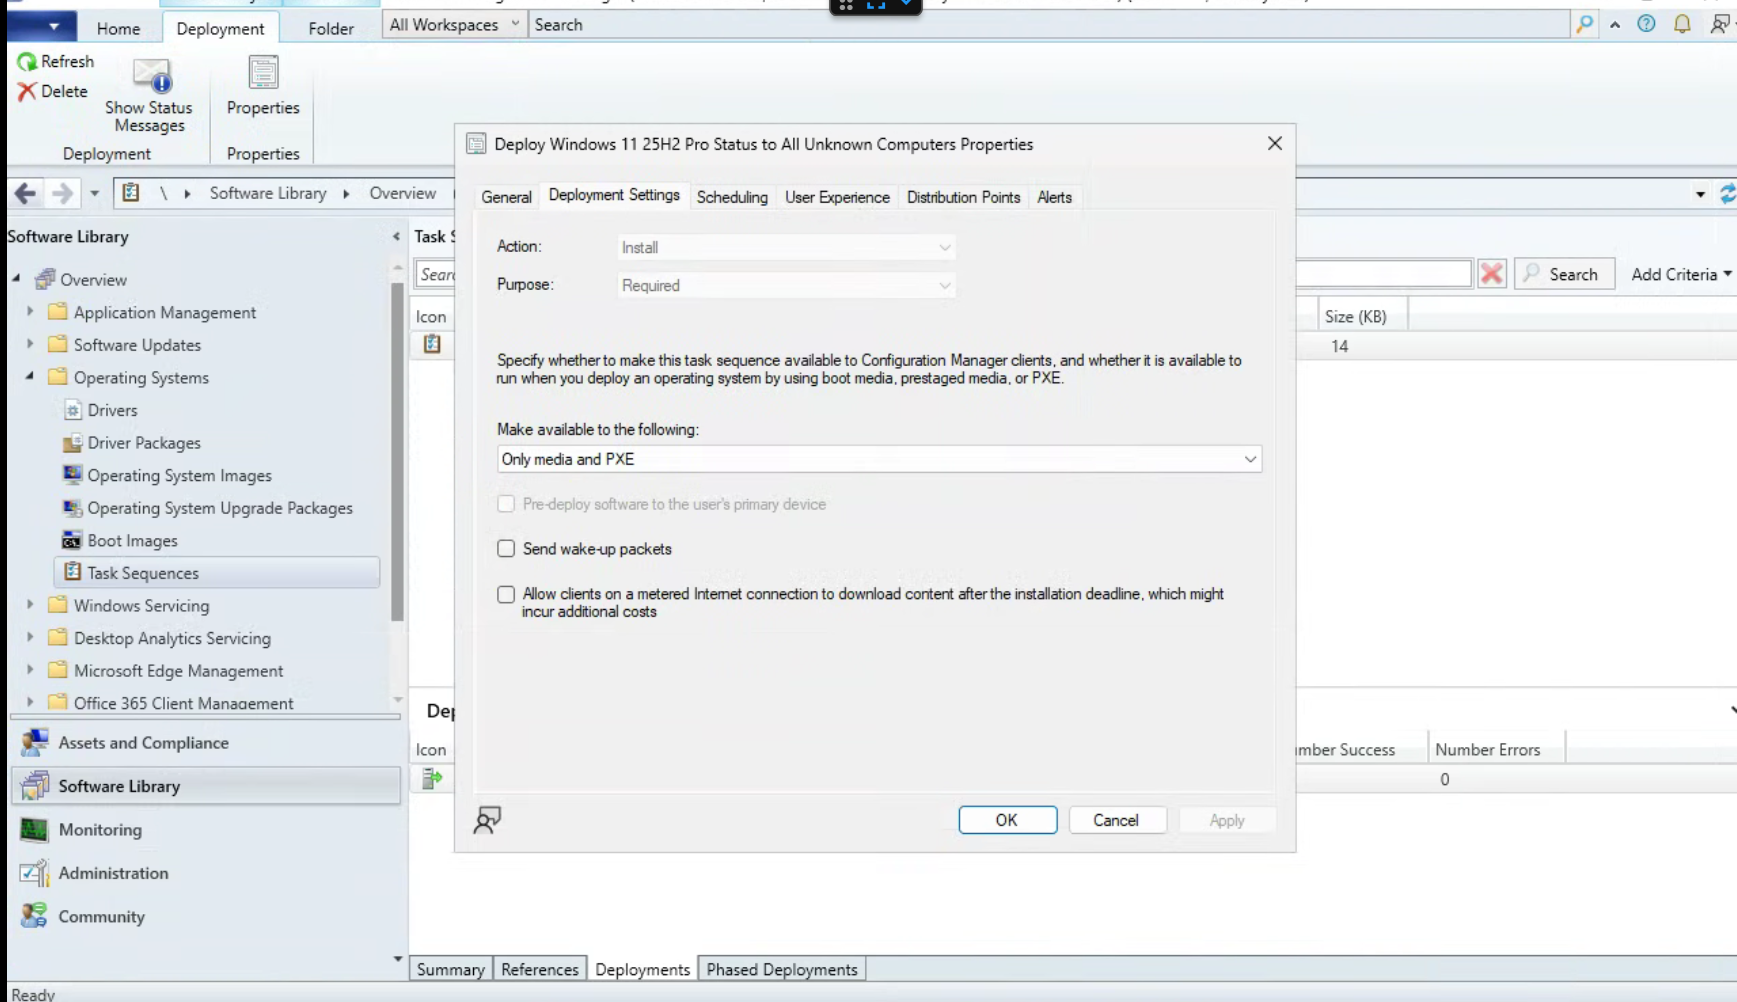
Required + All Unknown Computers means any unknown machine that boots from the network gets erased without asking. When you finish testing, remove the deployment: Task Sequences → click your task sequence → tab Deployments at the bottom → right-click the deployment → Delete.
Building the same machine again
After a successful build, the machine is no longer unknown: the site has a record of it, usually named MININT-…. Network-booting it again offers nothing. To rebuild it:
- Assets and Compliance → Overview → Devices → find the machine (compare its MAC Address in the Summary pane at the bottom) → right-click → Delete. Never delete x64 Unknown Computer or x86 Unknown Computer; those are built-in placeholders.
- On the site server: services.msc → ConfigMgr PXE Responder Service → Restart, to clear its cache.
- Wait two minutes, then network-boot the machine again.
Available or Required changes how it boots
| Purpose | Boot file sent | Behaviour |
|---|---|---|
| Available | pxeboot.com |
prints Press F12 for network service boot and waits |
| Required | pxeboot.n12 |
boots straight in, no key press |
With Available, you have about three seconds to press F12. Miss it, and the machine tries its next boot device, finds nothing, and stops. That looks like a PXE failure, but SMSPXE.log shows the boot file was sent successfully.
The text please provide these details to your Windows Deployment Services Administrator so that this request can be approved is normal: old wording that appears on every PXE boot, not a request for approval.
For a virtual machine, avoid VirtIO on the first attempt
Windows PE comes without VirtIO drivers. In Proxmox (the VM → Hardware), use a SATA disk and an Intel E1000 network adapter for the first build:
- VirtIO disk: network boot works, Windows PE loads, then Partition Disk 0 fails because there is no disk visible.
- VirtIO network: network boot works (that is firmware), then Windows PE loads with no network and the sequence stops at once.
Adding VirtIO drivers to the boot image makes builds faster, but do it after the task sequence itself works.
For real hardware
Enable UEFI network boot in the firmware and turn off Secure Boot for the first try. On Dell machines, the easy-to-miss setting is Enable UEFI Network Stack; without it, there is no network boot entry in UEFI mode.
If the sequence fails right after Windows PE loads, the boot image is missing the storage or network driver. For storage on a Dell, changing SATA Operation from RAID On to AHCI often fixes it immediately, because Windows PE has AHCI drivers but not Intel RST drivers.
Watching it run
On the server, SMSPXE.log records every network boot request and what it decided. If a machine gets no response, it tells you whether the request even arrived.
On the client, smsts.log shows what the task sequence just tried and what happened. It is the most important file in OS deployment, and it moves during the build: first X:\windows\temp\smstslog\ in Windows PE, then C:\_SMSTaskSequence\Logs\, then C:\Windows\CCM\Logs\.
To read it during the build, press F8 in Windows PE to open a command prompt. F8 only works if command support is switched on in the boot image: Software Library → Overview → Operating Systems → Boot Images → right-click the boot image → Properties → tab Customization → tick "Enable command support (testing only)", then let it update the distribution points. It opens a full command prompt to anyone at the machine during a build, so turn it on while you troubleshoot and off again afterwards. F8 works only in Windows PE, before the first reboot.
The logs, and what each one answers
Look up the server log folder instead of guessing it (PowerShell on the site server):
$CMLogs = Join-Path (Get-ItemProperty 'HKLM:\SOFTWARE\Microsoft\SMS\Identification')."Installation Directory" 'Logs'| Log | Where | Question it answers |
|---|---|---|
wsyncmgr.log |
server | did the catalogue sync, and what was requested |
WCM.log |
server | is the site configuring WSUS correctly |
ruleengine.log |
server | what did the deployment rule match, and what did it do |
SMSPXE.log |
server | which machines asked to network boot, and what was sent |
WUAHandler.log |
client | did the update scan reach the server, was policy overridden |
UpdatesDeployment.log |
client | assignment evaluation -- exists only once something is deployed |
UpdatesHandler.log |
client | update content download and installation |
smsts.log |
client | everything about a running task sequence |
Client logs are in C:\Windows\CCM\Logs\. Open them with CMTrace, which is in the tools folder of the Configuration Manager installation.
A client health check that covers most of it in one paste:
Get-ItemProperty 'HKLM:\SOFTWARE\Policies\Microsoft\Windows\WindowsUpdate' |
  Select-Object WUServer, DoNotConnectToWindowsUpdateInternetLocations, DisableDualScan

@(Get-WmiObject -Namespace root\ccm\Policy\Machine\ActualConfig -Class CCM_UpdateCMAssignment).Count

Get-WmiObject -Namespace root\ccm\SoftwareUpdates\UpdatesStore -Class CCM_UpdateStatus |
  Group-Object Status | Select-Object Name, Count
That assignment count is the fastest check in the whole system. Zero means no deployment ever reached this machine, so the problem is targeting or policy, not installation.
To start the client cycles now instead of waiting:
([wmiclass]'root\ccm:SMS_Client').TriggerSchedule('{00000000-0000-0000-0000-000000000021}')  # Machine policy
([wmiclass]'root\ccm:SMS_Client').TriggerSchedule('{00000000-0000-0000-0000-000000000113}')  # Software update scan
([wmiclass]'root\ccm:SMS_Client').TriggerSchedule('{00000000-0000-0000-0000-000000000108}')  # Update deployment evaluation
And to send a client's compliance results to the server right away:
$store = New-Object -ComObject Microsoft.CCM.UpdatesStore
$store.RefreshServerComplianceState()
Update content download fails with "access denied"
Downloading update content failed with access denied, and no PatchDownloader.log was written at all. That means it failed before the download started: on the folder path, not on the internet.
The share was granted to Domain Admins. An elevated PowerShell could write to it, but the Configuration Manager console runs non-elevated by default, and a non-elevated process has its admin group memberships removed from its token. Because the share was on the same machine, the file server checked that reduced token.
Give the rights to your user account directly (user accounts are never filtered out), and run the console elevated (right-click → Run as administrator):
Grant-SmbShareAccess -Name 'Sources$' -AccountName 'YOURDOMAIN\admin' -AccessRight Change -ForceWhenever you see access denied in this project, ask first: which account is actually doing the work?
What I would do differently
Fix the DNS from DHCP on day one, not the evening before network deployment. It was on my list for weeks as "later", and it was the one thing I could not work around by hand.
Check the client before you believe the console. The two findings that cost the most time, the client that updated itself and the zero in the Required column, would have taken half an hour instead of several evenings if I had first asked the machine itself. The console shows reports; the client has the facts.
What it looks like when it works
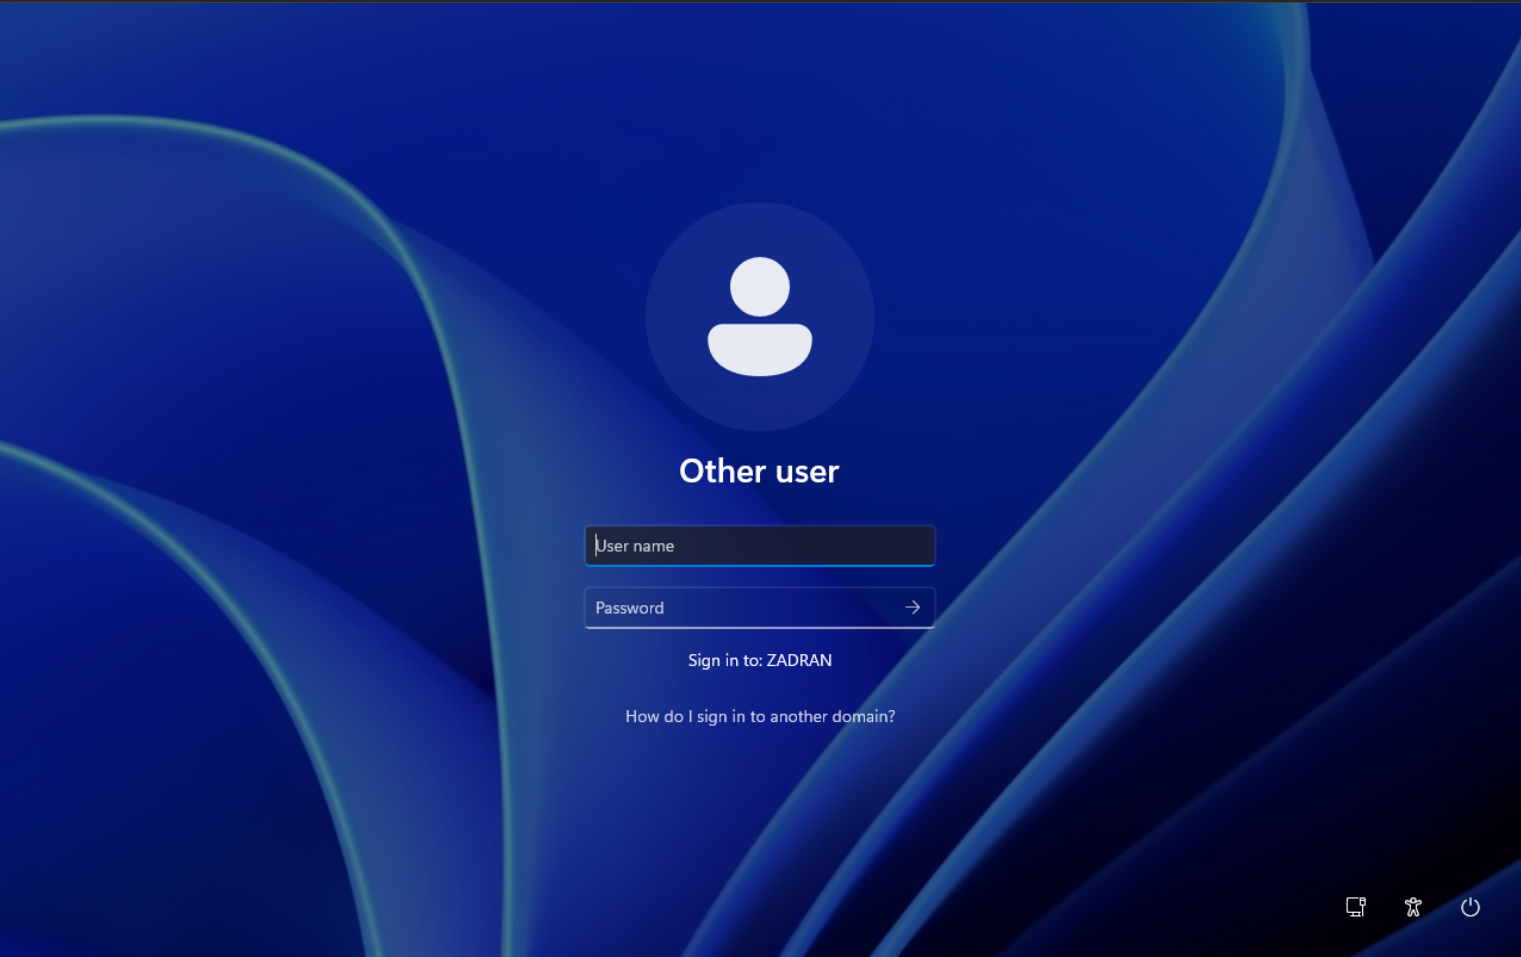
An empty laptop, connected to the network and switched on. A short countdown warns that the disk will be erased. Then about twenty minutes of progress bars, a few reboots, and a login screen. The machine has a name, is joined to the domain, has the management client installed and reporting, and appears in the console, ready for software and patches.
Nobody touched it after pressing the power button.
Did this guide work for you?
Thank you! That helps me keep this guide right.